บทความสรุปขั้นตอนในการสร้าง Agentic AI สามารถเข้าไปดู code จาก repo ได้เลย โดยในโปรเจคนี้ผมจะใช้ LLM Model ของ Claude และ Langchain
Preparing
เตรียมตัวกันก่อนเลย โค๊ดทั้งหมดอยู่ใน repo นี้แล้ว
 Thammasok
หลังจาก clone project มาแล้ว ให้เข้าไปที่ project แล้ว ติดตั้ง dependency ได้เลย
Create Environment
เริ่มต้นจากสร้าง virtual environment เพื่อควบคุม environment ที่เหมาะสมสำหรับ project นี้
python -m venv venvหรือ
python3 -m venv venvหลังจากนั้นให้ activate ตัว environment ที่สร้างไว้
source ./venv/bin/activateInstall dependency
หลังจาก สลับมาใช้ environment แล้ว ติดตั้ง dependency ได้เลย
pip install -r requirements.txtinstall dependency
Build AI Agent
ทีนี้เราจะเริ่ม implement ตัว agent กัน โดยสร้าง file main.py และ tools.py
Basic LLM
เริ่มต้นที่ไฟล์ main.py กันก่อนเลย ตัวนี้เป็นตัวหลักที่เราจะเขียนโค๊ดให้เรียกใช้งาน llm ซึ่งในโปรเจคนี้ผมใช้ cluade ของ anthropic
เราสามารถเรียกใช้งานผ่าน library ของ langchan ได้เลย
# Import
from langchain_openai import ChatOpenAI

# เรียกใช้งาน llm model
llm = ChatAnthropic(model="claude-sonnet-4-20250514", temperature=0)
ต่อมา เขามาสร้าง API Key ของตัว AI กันต่อเลย
โดยเราสามารถเข้าไปสร้างได้ที่ url นี้เลย https://console.anthropic.com/settings/keys
จากนี้นำ API Key มาใส่ไว้ที่ .env
ANTHROPIC_API_KEY=YOUR_API_KEYถ้าหากอยากใช้งาน GPT ของ OpenAI
ก็เปลี่ยน code ที่ import เป็น code ตัวนี้
# Import
from langchain_openai import ChatOpenAI

llm = ChatOpenAI(model="gpt-5-mini-2025-08-07", temperature=0)
และเข้าไปสร้าง API Key ที่นี่ https://platform.openai.com/settings/organization/api-keys
และสร้างตัวแปรเพื่อเก็บ key ของ OpenAI
OPENAI_API_KEY=YOUR_API_KEYเมื่อเสร็จแล้ว มาลองเรียกใช้งานมันกัน
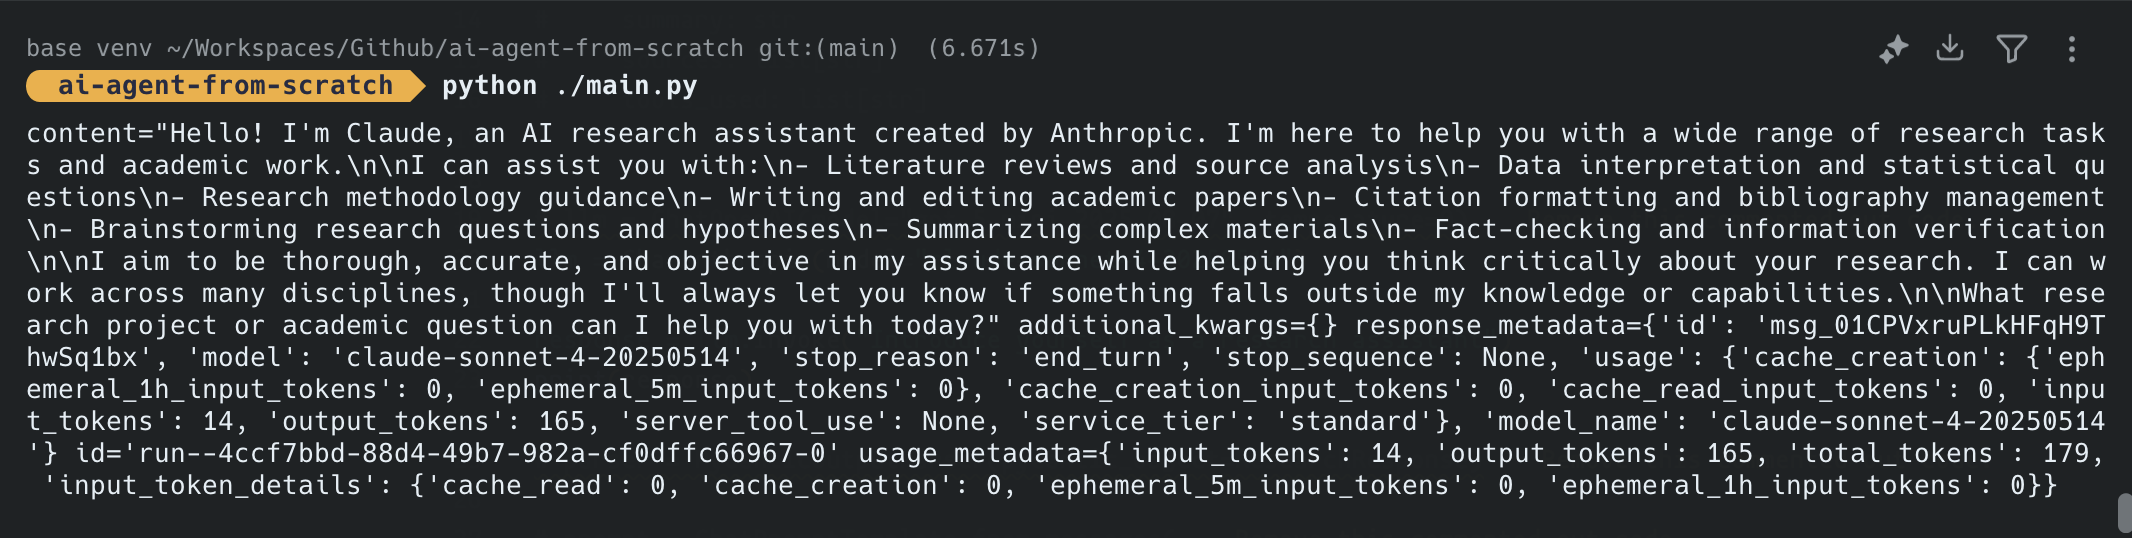
response = llm.invoke("Introduce yourself as a research assistant")

print(response)
test call model
ลอง run ดู
python ./main.pyถ้าใช้งานได้ จะได้ reponse มาประมาณนี้ (ข้อความอาจจะไม่เหมือนกันก็ได้นะ)
Structure Output Model
ต่อมาเรามาลงรายละเอียดโครงสร้าง prompt templat ของ model กัน โดยเราจะใช้ library ของ langchain core โดยเราจะใช้ 2 ตัวนี้
# Import
from pydantic import BaseModel
from langchain_core.prompts import ChatPromptTemplate
from langchain_core.output_parsers import PydanticOutputParser
จากนั้น เราจะสร้าง class ResearchResponse ขึ้นมาเพื่อกำหนดโครงสร้างของข้อมูล output ให้อยู่ในรูปแบบที่ต้องการ
class ResearchResponse(BaseModel):
    topic: str
    summary: str
    sources: list[str]
    tools_used: list[str]
ซึ่งเราสามารถเพิ่ม field อื่นๆ ที่เราอยากได้เข้าไปอีกก็ได้นะ ตราบใดที่ class ทั้งหมดมันสืบทอดจาก BaseModel
ทีนี้ เราต้องสร้างอีกตัวนึงคือ parser เราหลักแปลง output ของเรา ซึ่งเราสามารถกำหนดค่าอื่นๆ เพิ่มเติมเข้าไปได้ด้วย เช่น กำหนด type เป็น json
parser = PydanticOutputParser(pydantic_object=ResearchResponse, type="json")parser
Prompt Template
ส่วนนี้เป็นการกำหมด prompt template ของ llm ของเรา ว่าเราอยากจะให้ llm ของเราตอบกลับมาในรูปแบบไหน เข้าไปดูรูปแบบการกำหนดได้ที่นี่ ChatPromptTemplate
prompt = ChatPromptTemplate(
    [
        (
            "system",
            """
            You are a research assistant that will help generate a research paper.
            Answer the user query and use neccessary tools.
            Wrap the output in this format and provide no other text\n{format_instructions}
            """,
        ),
        ("placeholder", "{chat_history}"),
        ("human", "{query}"),
        ("placeholder", "{agent_scratchpad}"),
    ]
).partial(format_instructions=parser.get_format_instructions())
Prompt Template
ในตัวอย่าง สิ่งแรกที่เราจะทำเลย คือ การกำหนดข้อความของระบบ เพื่อให้ llm รู้ว่า ควรทำอะไร
You are a research assistant that will help generate a research paper.
Answer the user query and use neccessary tools.
Wrap the output in this format and provide no other text\n{format_instructions}
ส่วนท้าย {format_instructions} เป็นการบอกว่า ให้ตอบออกมาใน format ที่เราต้องการ
Create & Running Agent
เอาละต่อเรา เราจะสร้างและเรียกใช้งานมันกัน ให้เรา import create_tool_calling_agent จาก langchain.agents มาก่อนเลย
# import
from langchain.agents import create_tool_calling_agent, AgentExecutor
จากนั้นให้เพิ่มคำสั่งในการใช้งาน
agent = create_tool_calling_agent(
    llm=llm,
    prompt=prompt,
    tools=[]
)

agent_executor = AgentExecutor(agent=agent, tools=[], verbose=True)
ซึ่งตอนนี้เรายังไม่ใช้ tools สามารถใส่เป็น [] ไปได้ก่อนเลย
จากนั้นมาลองทดสอบโดยการ execute มันกัน โดยเราจะต้องส่งค่า prompt ไปให้มันผ่านตัวแปร query
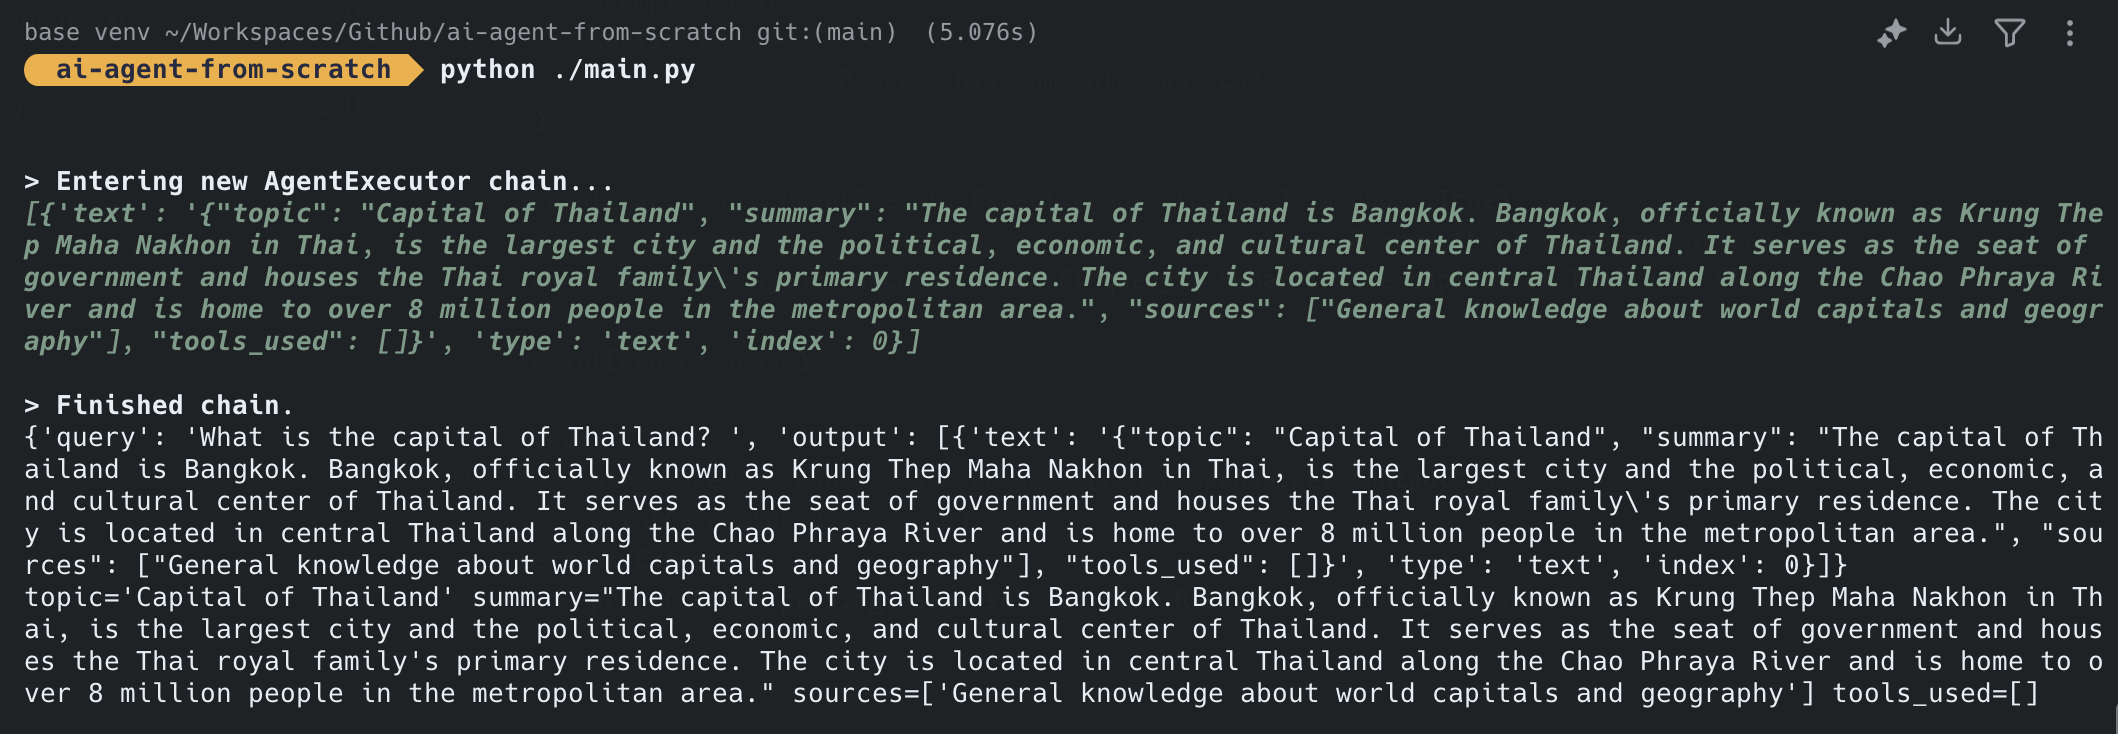
raw_response = agent_executor.invoke({"query": "What is the capital of Thailand? "})

print(raw_response)
จากนั้นลอง run ดูได้เลย
python ./main.pyถ้าผ่านก็จะได้ output ออกมา
Output Parser
ทีนี้ ถ้าเราต้องการเข้าถึงข้อมูลที่ตอบกลับมา เพื่อเอาไปใช้งานต่อก็แค่ใช้คำสั่ง parser.parse() เพื่อเข้าไปดึงข้อมูลออกมา เช่น
structured_response = parser.parse(raw_response.get("output")[0]["text"])
print(structured_response)
Get Data from Text
เอาละเมื่อได้แล้ว เรามาลองรับข้อมูลจาก input และให้ส่งค่าไปยัง LLM กันดีกว่า โดยการเปลี่ยนคำสั่งด้านบนเป็นแบบนี้
query = input("What topic would you like to research? ")
raw_response = agent_executor.invoke({"query": query})

print(raw_response)
เท่านี้เราก็สามารถรับค่าจาก terminal ได้แล้ว
Tools
เราจะเพิ่มการใช้งาน tools เข้าไป โดย Tools นั้น เป็นความสามารถที่ให้ LLM/Agent สามารถเรียกใช้ฟังก์ชัน หรือ เครื่องมือจากภายนอกได้ เพื่อเพิ่มความสามารถให้เกินกว่าการสร้างข้อความเพียงอย่างเดียว
ประเภทของ Tools ที่เราใช้กันบ่อยๆ เลย คือ
1.การเข้าถึงข้อมูล
- Web search (การค้นหาข้อมูลจากอินเทอร์เน็ต)
- Database queries (สืบค้นฐานข้อมูล)
- File reading/writing (อ่าน/เขียนไฟล์)
- API calls (เรียกใช้ API ต่างๆ)
2.การคำนวณและประมวลผล
- Calculator (เครื่องคิดเลข)
- Code execution (รันโค้ด)
- Data analysis (วิเคราะห์ข้อมูล)
- Image processing (ประมวลผลภาพ)
3.การสร้าง และ แก้ไข
- Image generation (สร้างภาพ)
- Code generation (สร้างโค้ด)
- Document creation (สร้างเอกสาร)
ส่วนวิธีการทำงานก็สามารถทำได้หลายแบบเช่นกัน เช่น
- Function Calling: LLM ระบุว่าต้องใช้เครื่องมือใด
- Parameter Extraction: ดึงพารามิเตอร์ที่ต้องการส่งให้เครื่องมือ
- Tool Execution: เรียกใช้เครื่องมือและรับผลลัพธ์
- Result Integration: นำผลลัพธ์มาใช้ในการตอบคำถาม
กลับมาที่โปรเจคของเรากัน
Adding tools
ในโปรเจคนี้เราจะใช้ tools จาก langchain_community กัน เพื่อที่เราจะได้ไม่ต้องสร้างมันขึ้นมาเอง
ตัวที่เราจะใช้ คือ WikipediaQueryRun กับ DuckDuckGoSearchRun
# import
from langchain_community.tools import WikipediaQueryRun, DuckDuckGoSearchRun
from langchain.tools import Tool
DuckDuckGoSearchRun จะทำตัวเป็นเหมือน google search เพื่อค้นหาข้อมูลที่ต้องการ
search = DuckDuckGoSearchRun()
search_tool = Tool(
    name="search",
    func=search.run,
    description="Search the web for information",
)
จากนั้นเราจะไปเพิ่มมันใน main.py กัน
#import
from tools import search_tool
และไปเปลี่ยน tools=[] เป็น tools=[search_tool]
#import
from tools import search_tool

tools = [search_tool]
agent = create_tool_calling_agent(
    llm=llm,
    prompt=prompt,
    tools=tools,
)

agent_executor = AgentExecutor(agent=agent, tools=tools, verbose=True)

try:
    structured_response = parser.parse(raw_response.get("output"))
    print(structured_response)
except Exception as e:
    print("Error parsing response", e, "Raw Response - ", raw_response)
calling agent with search tool
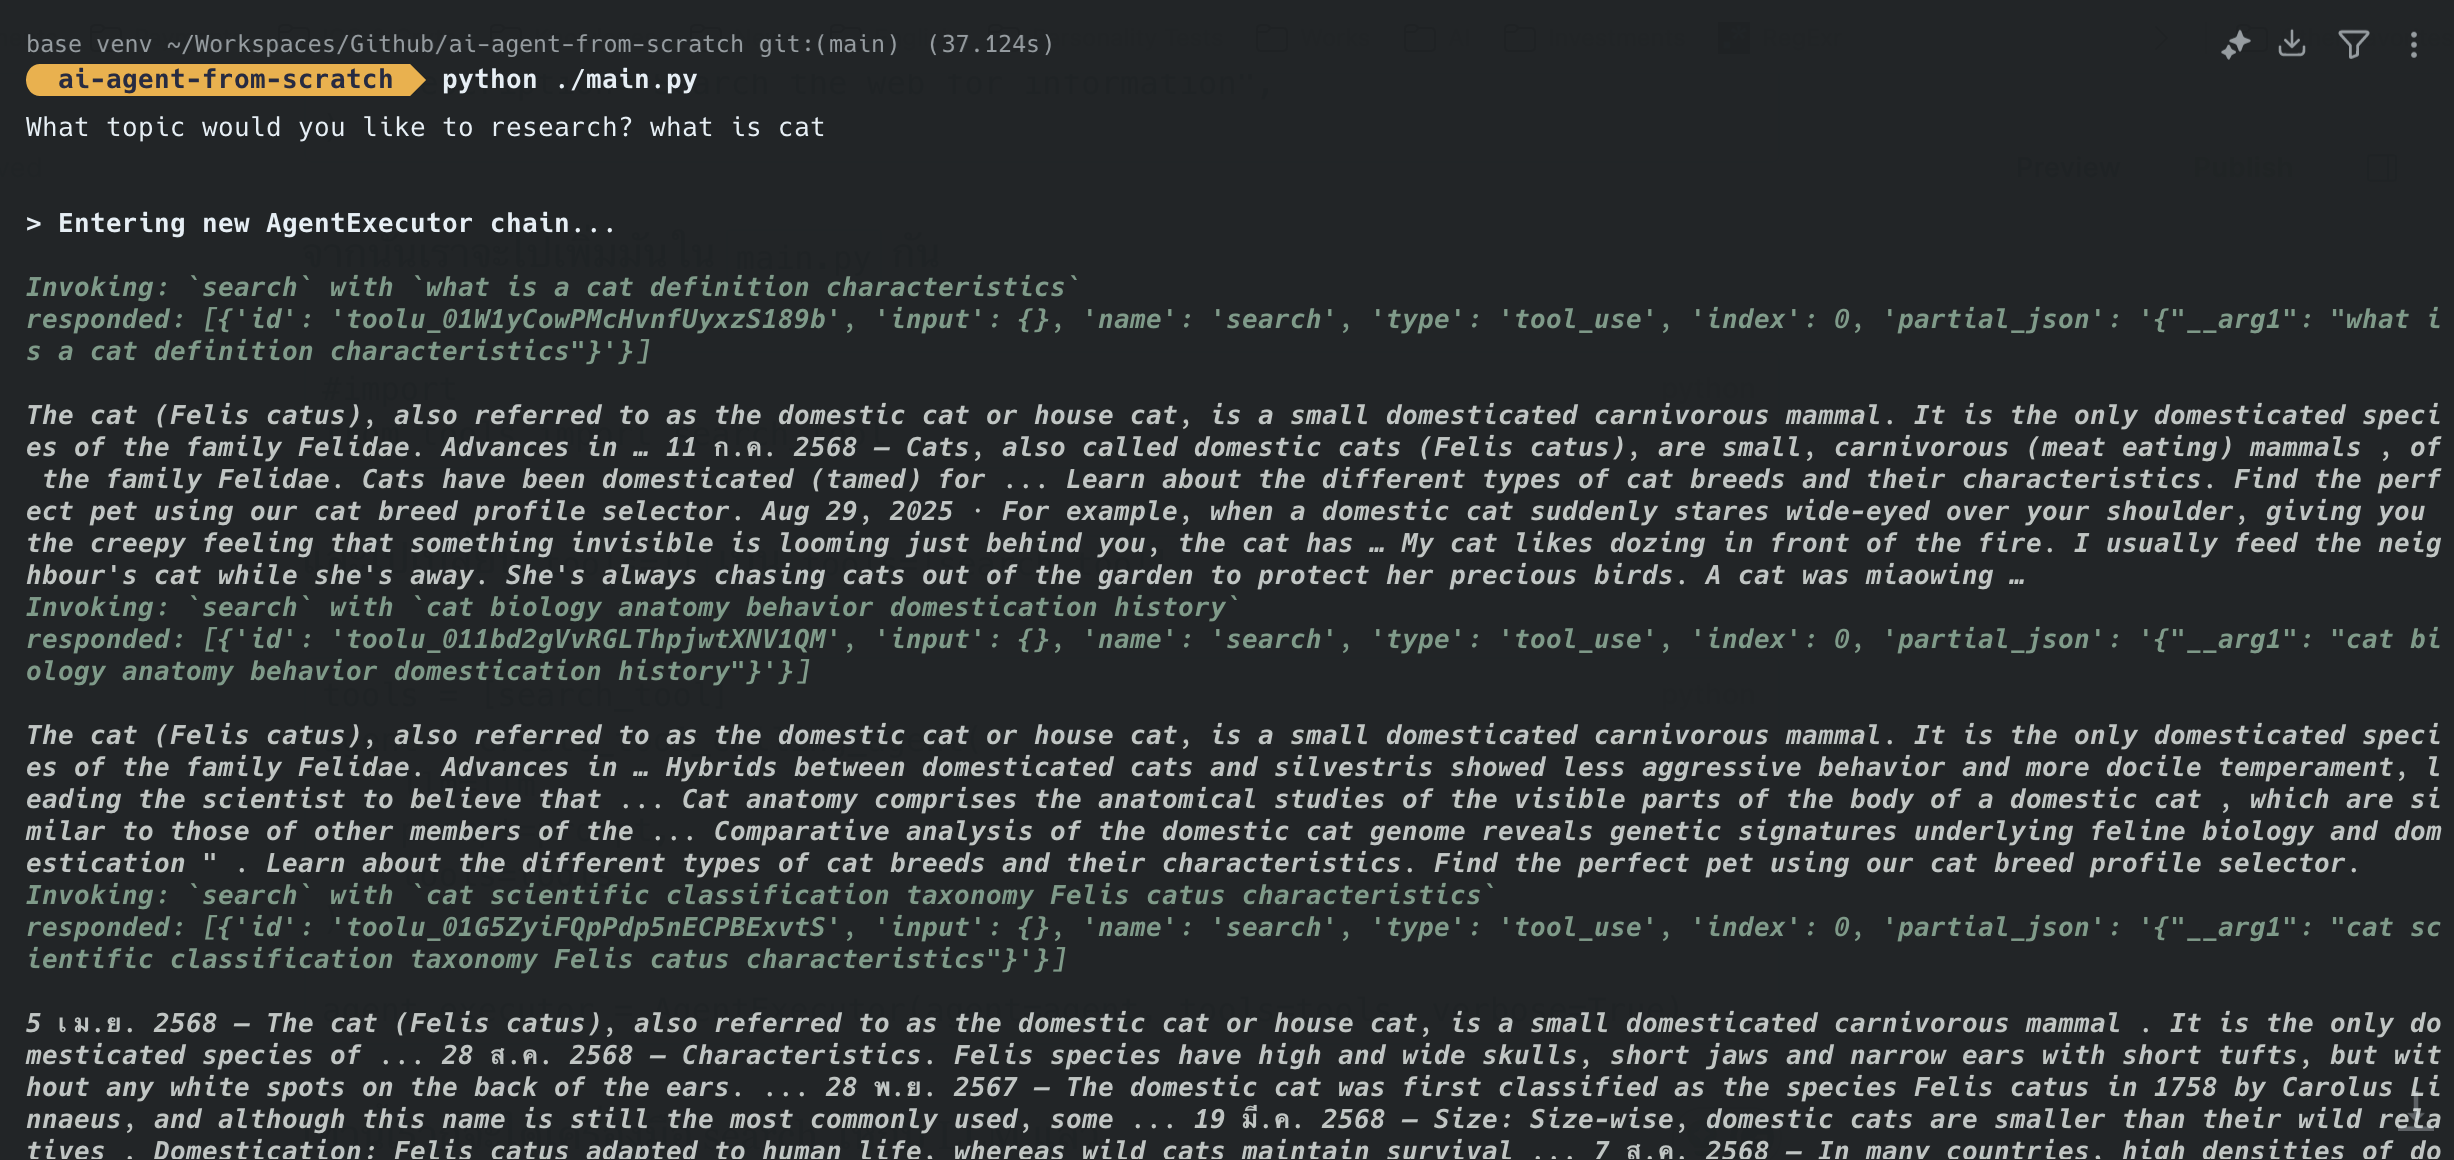
เท่านี้เราก็จะได้เครื่องมือ search ให้กับ LLM แล้ว
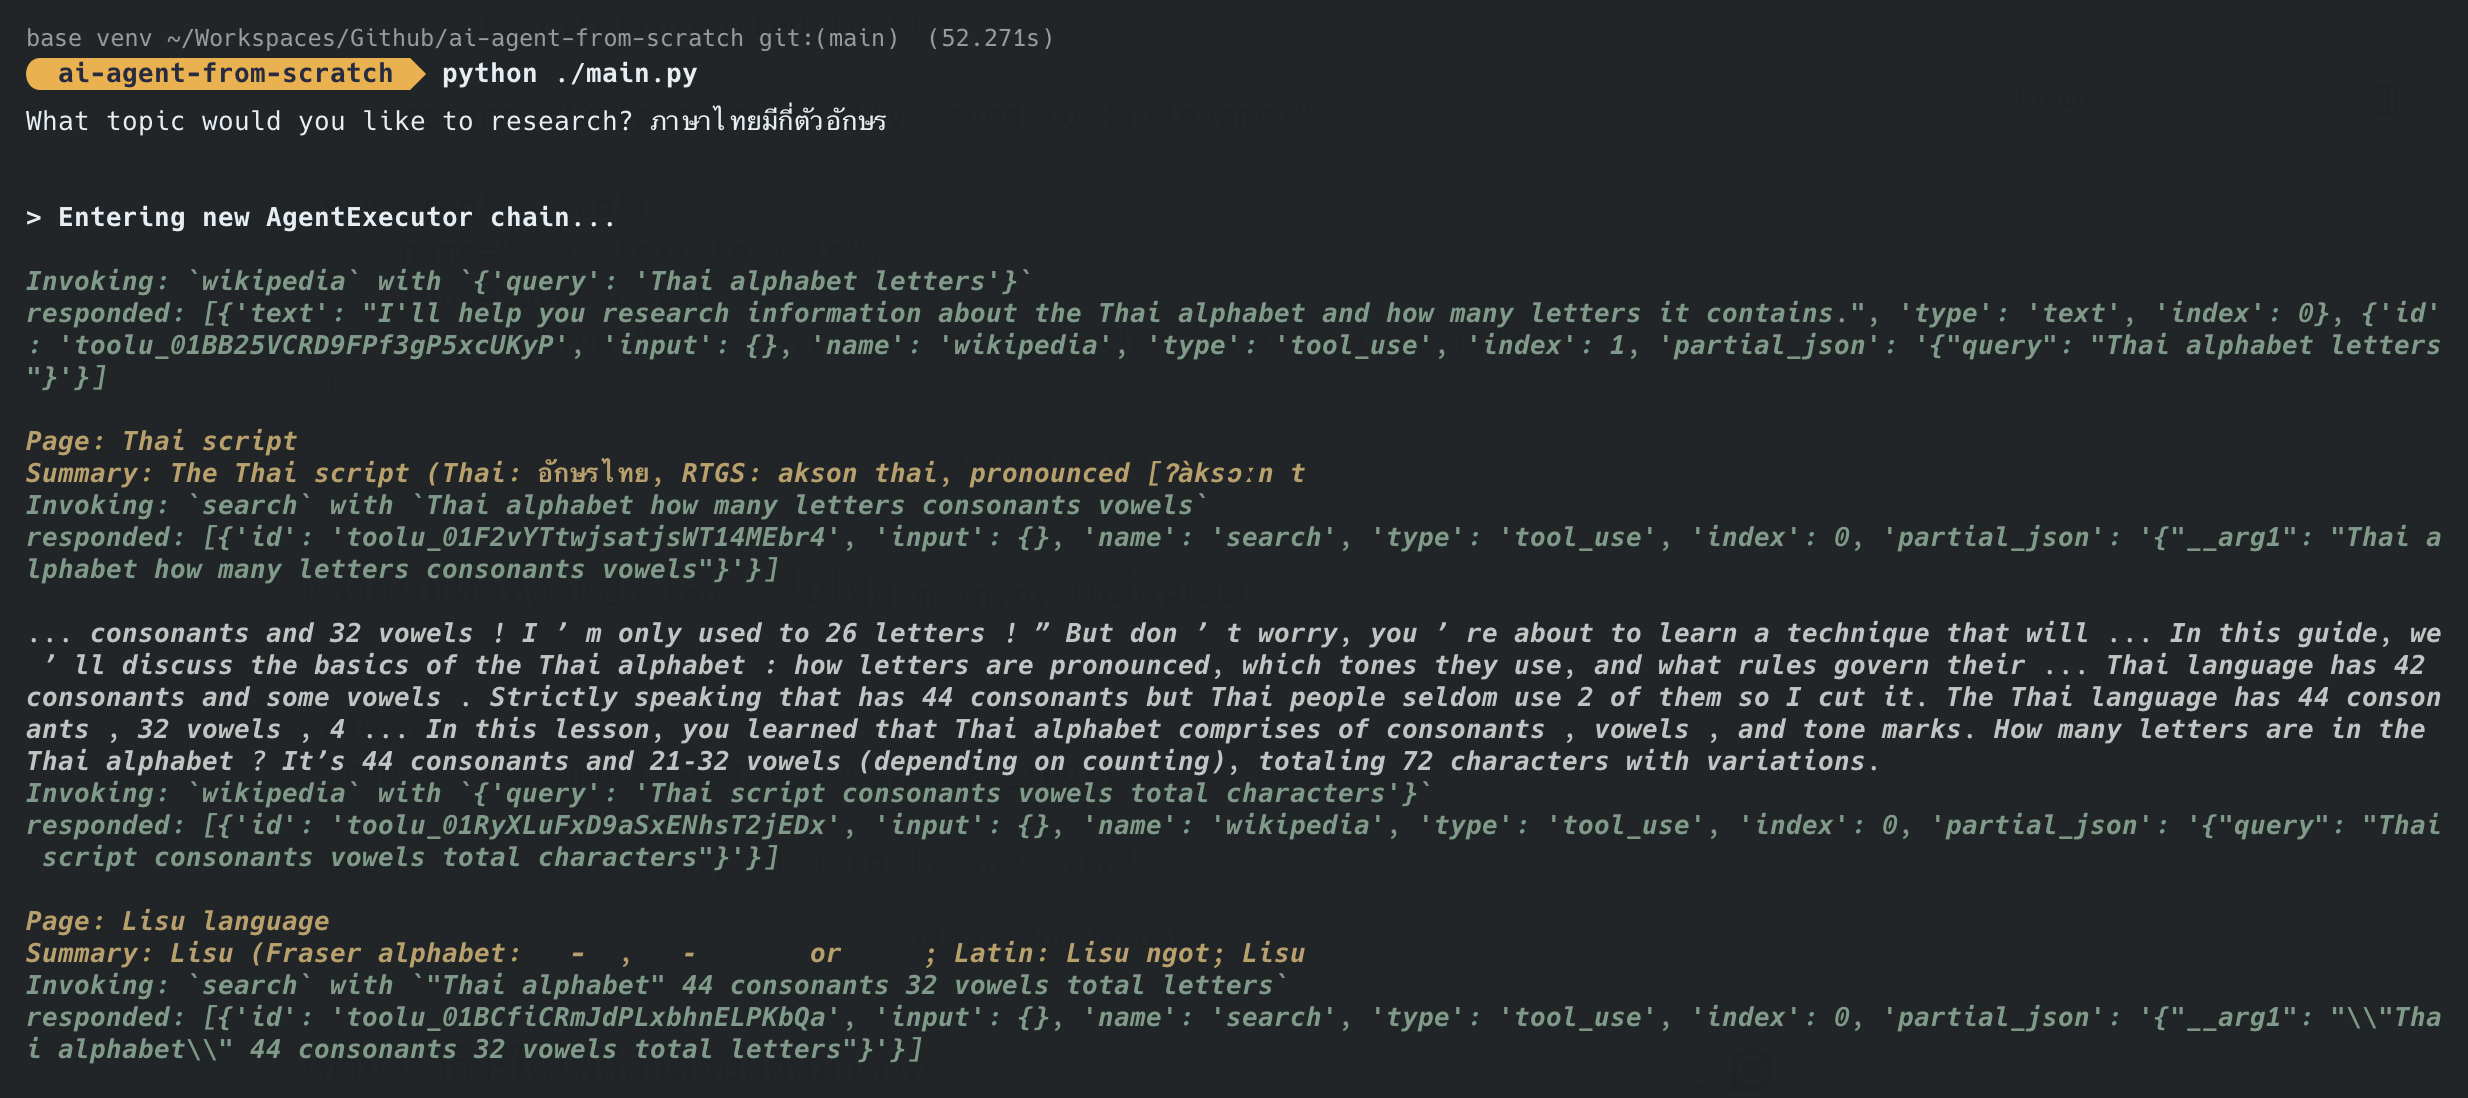
ลอง run ทดสอบดู ก็จะเห็นว่า Agent ของเรานั้น ได้ไปเรียกใช้งาน tools แล้ว
เรามาลองเพิ่มกันอีกตัว คือ Wikipedia กัน ซึ่งตัวนี้ง่ายมากๆ ตรงไปตรงมา
# import
from langchain_community.utilities import WikipediaAPIWrapper
from langchain_community.utilities import WikipediaAPIWrapper

api_wrapper = WikipediaAPIWrapper(top_k_results=1, doc_content_chars_max=100)
wiki_tool = WikipediaQueryRun(api_wrapper=api_wrapper)
เราจะกำหนด doc_content_chars_max ให้ไม่เกิน 100 ตัวอักษรด้วย
จากนั้นไปเพิ่ม wiki_tool เข้าไปในตัวแปร tools ในไฟล์ main.py เท่านี้ก็ได้แล้ว
#import
from tools import search_tool, wiki_tool

tools = [search_tool, wiki_tool]
main.py
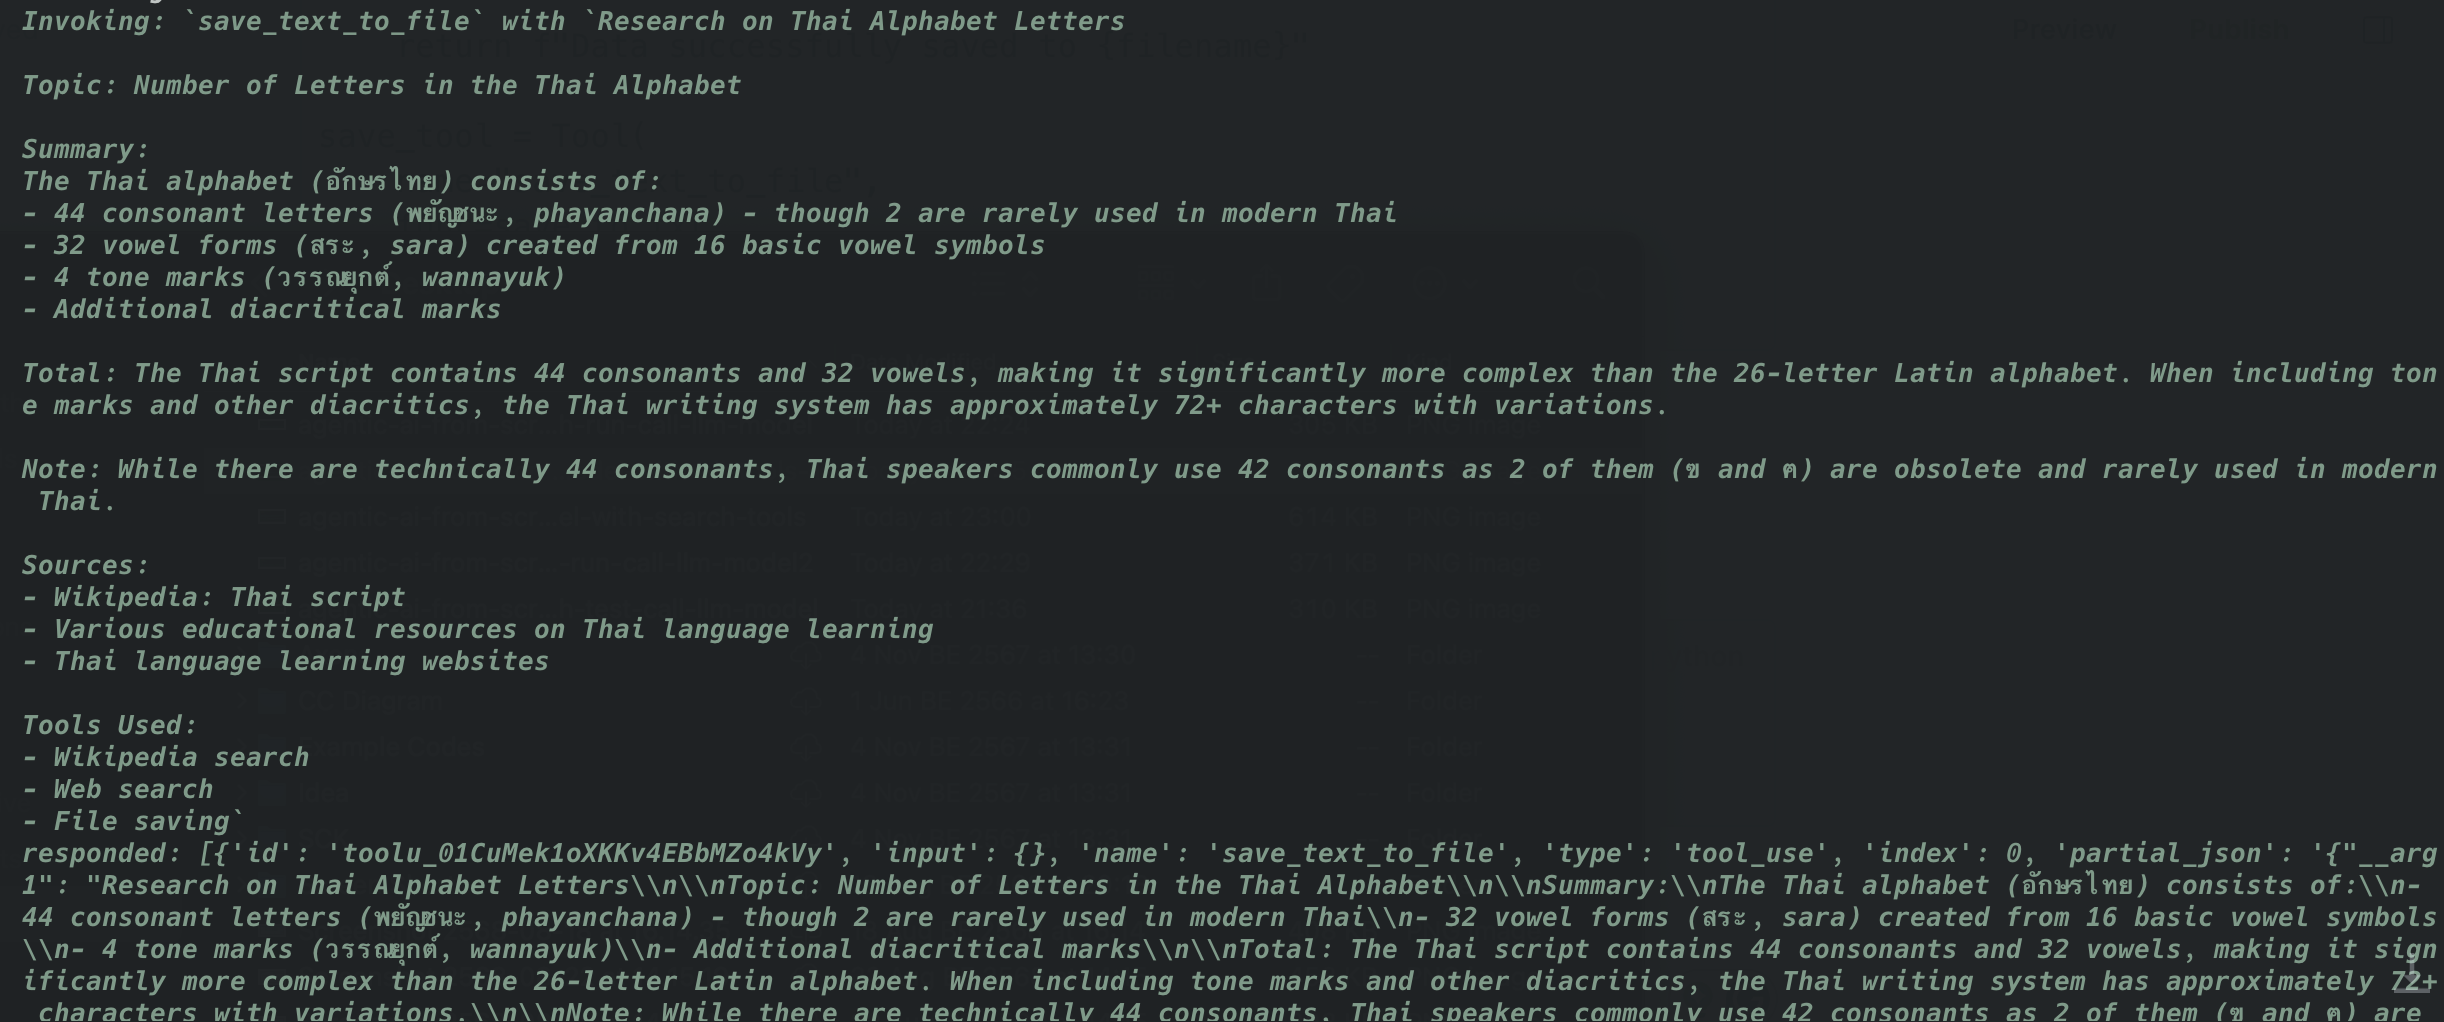
ตัวสุดท้ายของโปรเจคนี้ เราจะให้มันสร้างไฟล์คำตอบไว้ให้เราด้วยเลย โดยเขียนคำสั่งไว้แบบนี้
#import
from datetime import datetime
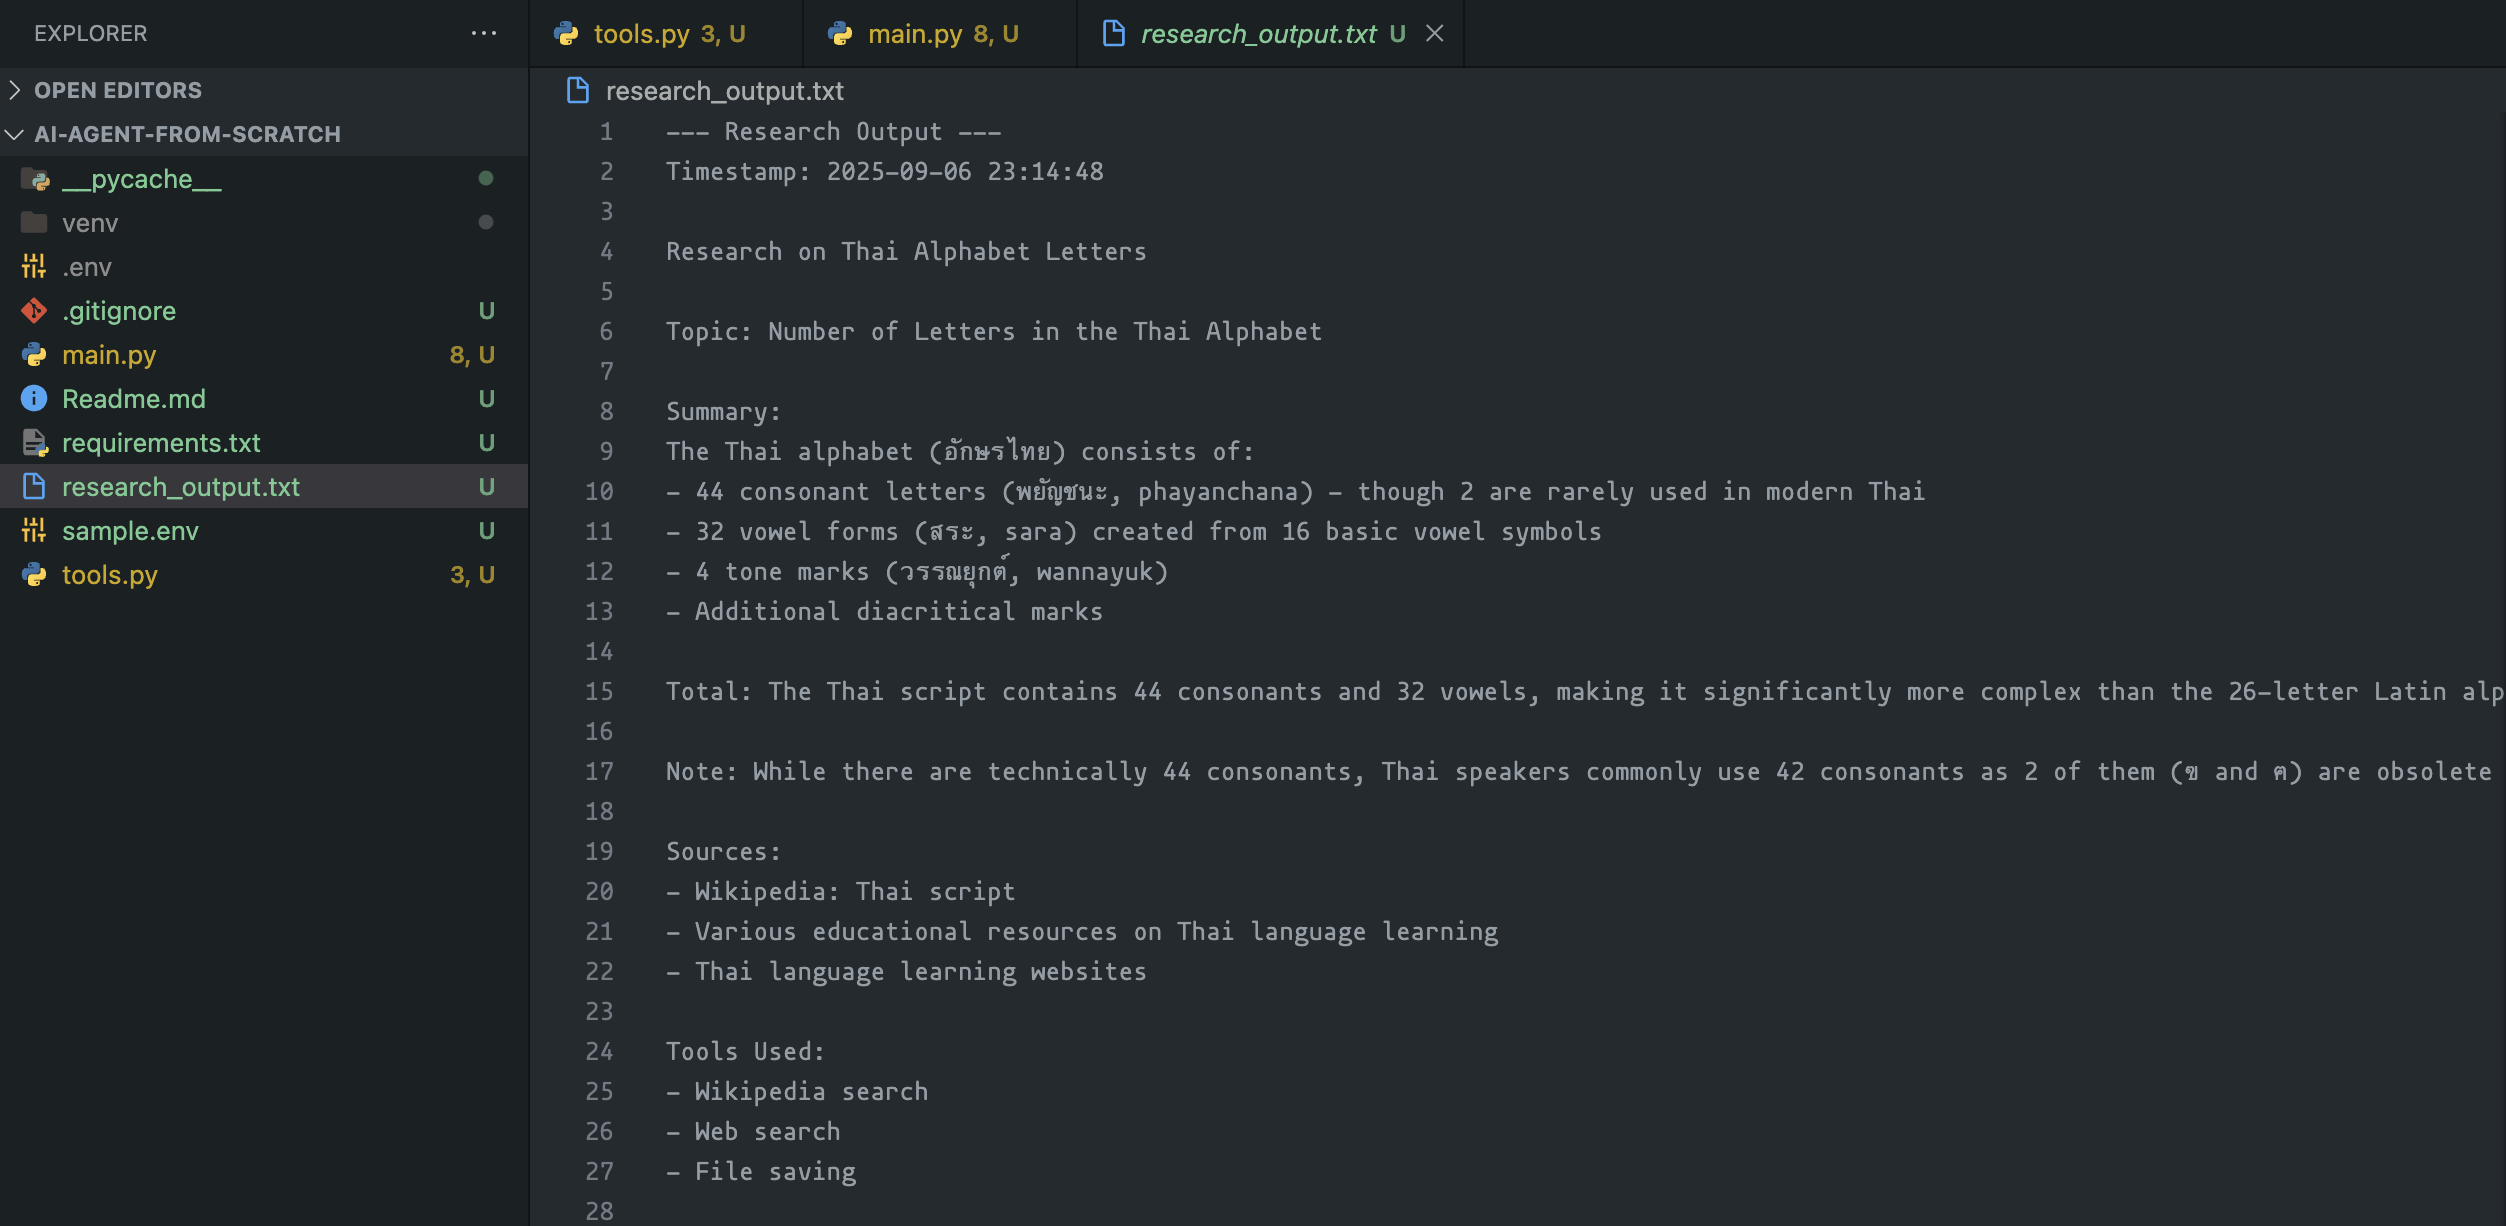
def save_to_txt(data: str, filename: str = "research_output.txt"):
timestamp = datetime.now().strftime("%Y-%m-%d %H:%M:%S")
formatted_text = f"--- Research Output ---\nTimestamp: {timestamp}\n\n{data}\n\n"
with open(filename, "a", encoding="utf-8") as f:
f.write(formatted_text)
return f"Data successfully saved to {filename}"
save_tool = Tool(
name="save_text_to_file",
func=save_to_txt,
description="Saves structured research data to a text file.",
)save to text file
แล้วก็ไปเพิ่มที่ตัวแปร tools ในไฟล์ main.py เหมือนเดิม
#import
from tools import search_tool, wiki_tool, save_tool

tools = [search_tool, wiki_tool, save_tool]
add save_tool to tools
เท่านี้ เราก็จะได้ไฟล์คำตอบออกมาด้วย
ทั้งหมดนี้เป็นโปรเจคง่ายๆ สำหรับสร้าง Agent ขึ้นมา ยังมีเรื่องอื่นๆ อีกมากที่เราสามารถทำมันได้ ไว้มาแชร์เพิ่มเติมในบทความหลัง