จดบันทึก workshop ของ เม้งกับพี่โจ
เราถึงใช้ Docker เพื่อแก้ปัญหาอะไร
- Environment
- Work on my machine
- Install, Upgrade Remove and Repeat
- Security
- Testing
การใช้ docker จะช่วยให้เราแยกการทำงานของระบบ ซึ่งจะช่วยให้เราสามารถจัดการและ
Docker Basic
ติดตั้ง docker
หลังจากที่ติดตั้งแล้ว ลองมาเล่นคำสั่งมันดูกันหน่อย
เริ่มต้นด้วยอะไรง่ายๆ ก่อนเลย
docker pull hello-worldจากนั้นลองสั่ง run docker ที่ pull ลงมาดู
docker container run -it hello-worldเราก็จะได้หน้าตาแบบนี้
Hello from Docker!
This message shows that your installation appears to be working correctly.

To generate this message, Docker took the following steps:
 1. The Docker client contacted the Docker daemon.
 2. The Docker daemon pulled the "hello-world" image from the Docker Hub.
    (arm64v8)
 3. The Docker daemon created a new container from that image which runs the
    executable that produces the output you are currently reading.
 4. The Docker daemon streamed that output to the Docker client, which sent it
    to your terminal.

To try something more ambitious, you can run an Ubuntu container with:
 $ docker run -it ubuntu bash

Share images, automate workflows, and more with a free Docker ID:
 https://hub.docker.com/

For more examples and ideas, visit:
 https://docs.docker.com/get-started/
พื้นฐานของ Docker
docker system info: เพื่อดูข้อมูลรายละเอียดของ docker ของเรา
docker system infodocker context list: เพื่อดูว่าในเครื่องของเรามี docker run อยู่กี่ตัว
docker context listหากต้องการดูรายละเอียด context แต่ละตัวให้ใช้ inspect แล้วตามด้วยชื่อ context
docker context inspect defaultเช็คว่า docker container ของเราทำงานอยู่กี่ตัว
docker container psลบ container ออก
docker container rm hello-worldหากถ้าเราขี้เกียจพิมพ์ชื่อยาวๆ เราสามารถลบได้โดยใช้ 3 ตัวแรกของ CONTAINER ID เช่น ถ้าเรามี container id เป็น 51b39290e196 เราสามารถอ้างอิงถึง container นี้ได้โดยการระบบแค่ 3 ตัวหน้า ซึ่งก็คือ 51b
docker container rm 51bหากต้องการลบทั้งหมดที่ไม่ได้ใช้ ให้ใช้ prune แต่มันอาจจะไม่ได้ลบทั้งหมด ถ้า container ไหนที่กำลังใช้งานอยู่ หรือยังทำงานไม่เรียบร้อยจะลบไม่ได้
docker container pruneสุดท้าย ถ้าหากเราอยากรู้ว่ามีคำสั่งอะไรให้ใช้บ้าง ก็สั่ง run docker ใน command เลย
docker
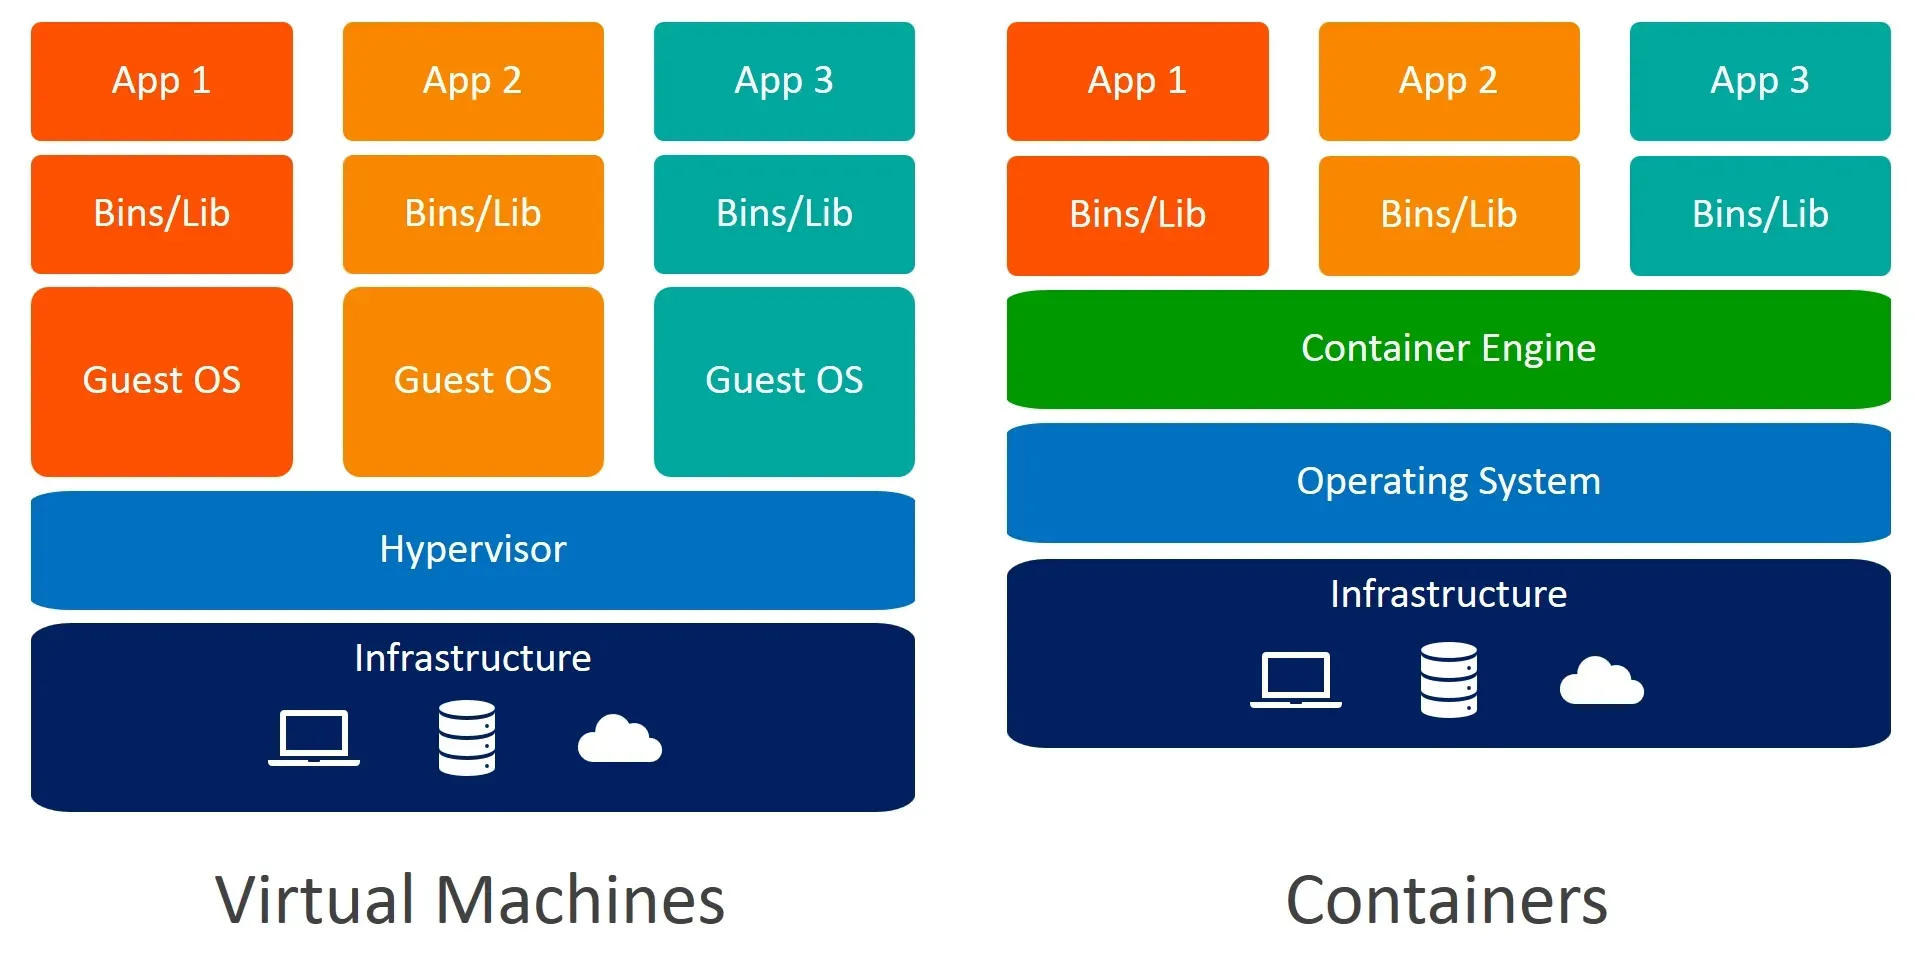
Run 'docker COMMAND --help' for more information on a command.Docker vs VM
ถ้าหากเราดูจากภาพแล้ว ในความเป็นจริง Docker จะไม่ได้ run ด้วย native แต่จะถูกห่อไว้ด้วย vm อีกที
โครงสร้างของ Docker มีการทำงานอย่างไร
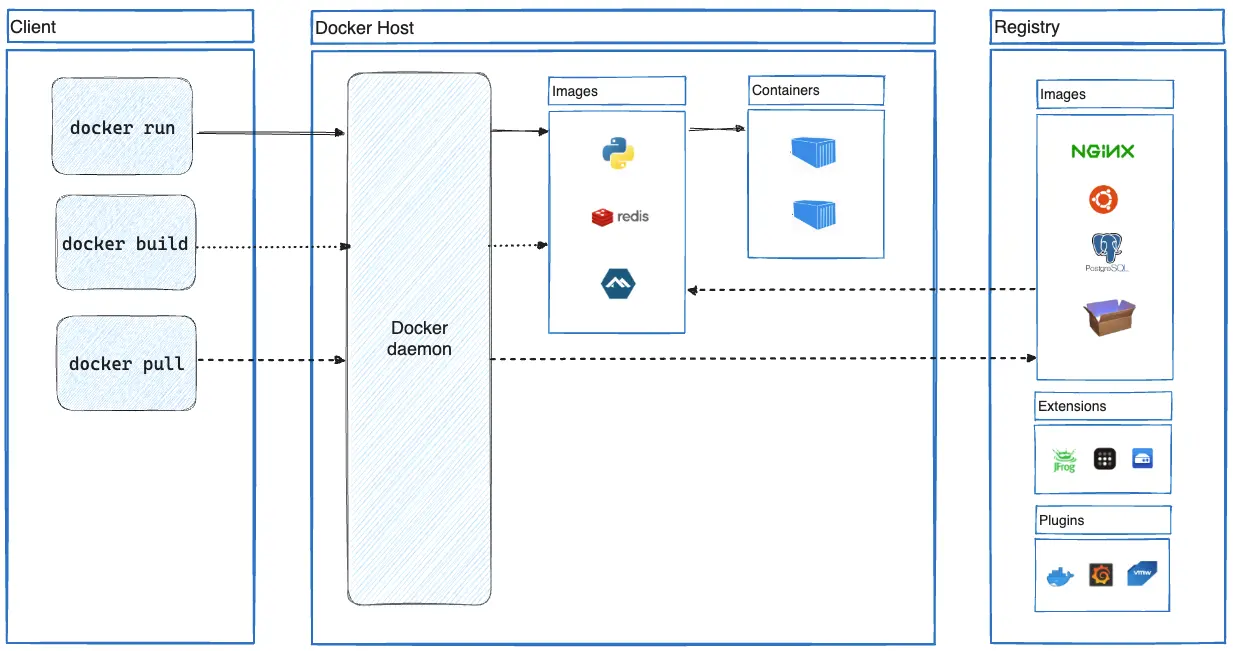
Docker Deamon / Docker Engine จะทำหน้าที่จัดการคำสั่งต่างๆ ที่ได้รับมาจาก CLI
Registry เป็นตัวที่ใช้ในการเก็บไฟล์ของ docker (image)
4 หัวข้อหลักที่ต้องรู้เมื่อใช้ Docker
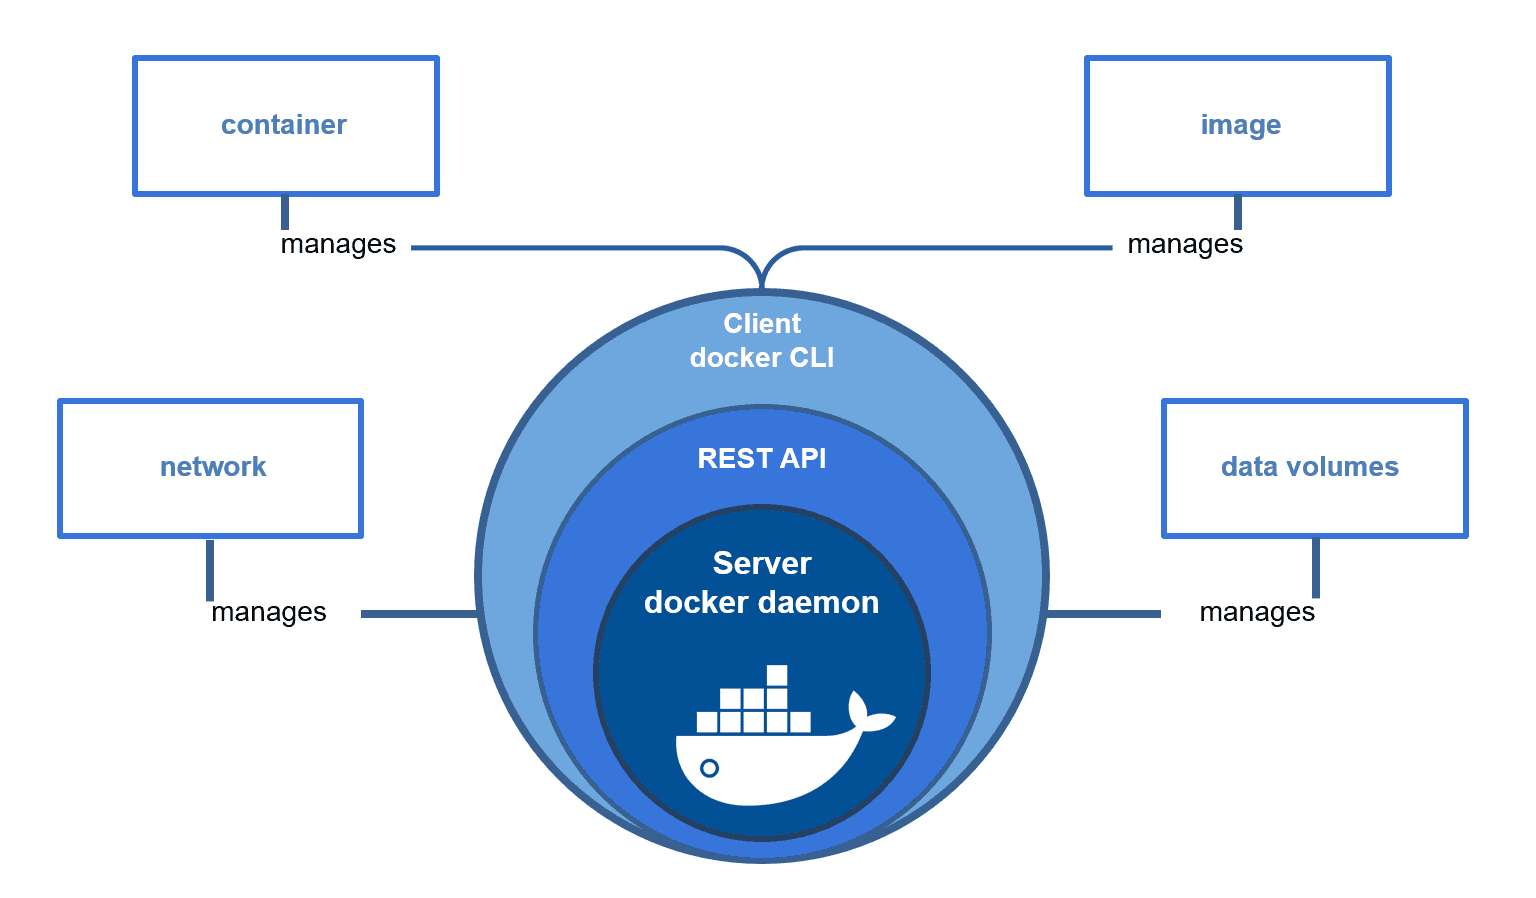
- Image: เป็นเหมือนกับพิมพ์เขียว
- Container: กลุ่มของการทำงาน
- Data Volumes: ที่เก็บ data ไว้ที่ไหน
- Network: ทำให้ container คุยระหว่างกันได้
Docker Image
เรียนรู้การสร้าง Docker Image โดยการทำตามขั้นตอนนี้
docker image pull nginx
docker images
docker run --detach --name my-nginx-container nginx
docker container ps
docker container exec -it my-nginx-container bash
อธิบายทีละ step
pull docker image ของ nginx
docker image pull nginxเมื่อ pull ลงมาแล้ว ลง docker images ดู เพื่อเช็คว่า nginx ของเราได้ถูก pull ลงมาแล้วหรือยัง
docker imagesจากนั้นเราจะสร้าง Container ของ nginx ขึ้นมา โดยทีให้มัน run อยู่ใน background ให้ใช้ --detach หรือ -d
docker run --detach --name my-nginx-container nginx

หรือ

docker run -d --name my-nginx-container nginx
เมื่อสร้าง Container แล้ว ลองเช็คดูว่ามันถูกสร้างขึ้นมาหรือยัง
docker container psลองเข้าไปใน container นั้น เพื่อดูว่าข้างในมันมีอะไรอยู่ เราจะใช้ exec แล้วระบุ CONTAINER NAME หรือ CONTAINER ID
docker container exec -it my-nginx-container bash

docker container exec -it 9367d694778b bash
Update index.html ใน Container
เรียนรู้การเข้าไปแก้ไขไฟล์ index.html ใน container
เริ่มต้นที่ run docker ขึ้นมาก่อนเลย
docker container exec -it my-nginx-container bashจากนั้นเข้าไปที่ที่เก็บไว้ /usr/share/nginx/html
cd /usr/share/nginx/htmlลงดูว่าใน ไฟล์ html มี อะไรอยู่บ้าง โดยใช้คำสั่ง พื้นฐานของ linux
ls -lจากนั้นเราจะสร้างไฟล์ หรือ เข้าไปแก้ไขไฟล์ท่ีเราต้องการ ผ่าน vim
vim index.htmlโดยทั่วไปแล้วจะไม่มี vim ติดตั้งมากับตัว container จึงต้องติดตั้ง vim ก่อน โดยใช้คำสั่งนี้
apt-get update && apt-get install vimจากนั้นก็กลับมาแก้ไขไฟล์ที่เราต้องการ เมื่อเสร็จแล้ว
สังเกตว่า เราสามารถใช้คำสั่ง command line apt-get update && apt-get install vim ได้ข้างใน container ของเราได้เลย
Create an Image from CLI
สร้างไฟล์ Image โดย
- -a ผู้สร้าง
- -m ระบุข้อความ
docker container commit\
  -a nutshell -m "make nginx to my welcome me"\
  my-nginx-container \
  my-nginx-image:v1
หลังจาก run command แล้วลอง
docker image lsสั่ง run container พร้อมกันเข้าเข้าไปที่ image ที่พึ่งสร้าง
docker run -it --name my-nginx-container-v1 my-nginx-image:v1 bashถ้าเข้าไปได้แล้ว ลอง run linux command ดู
cat /usr/share/nginx/html/index.htmlPublic Image to Registery
ต่อไปเราจะ public image ขึ้นไปอยู่ที่ Registry ซึ่งเราจะใช้ Docker Hub ซึ่งเราจะเอา image ของเรามา public ไว้บนนี้
เราสามารถสมัคร package เพื่อให้สามารถสร้าง repository ที่เป็น private ได้
เริ่มที่สมัครกันก่อนเลย
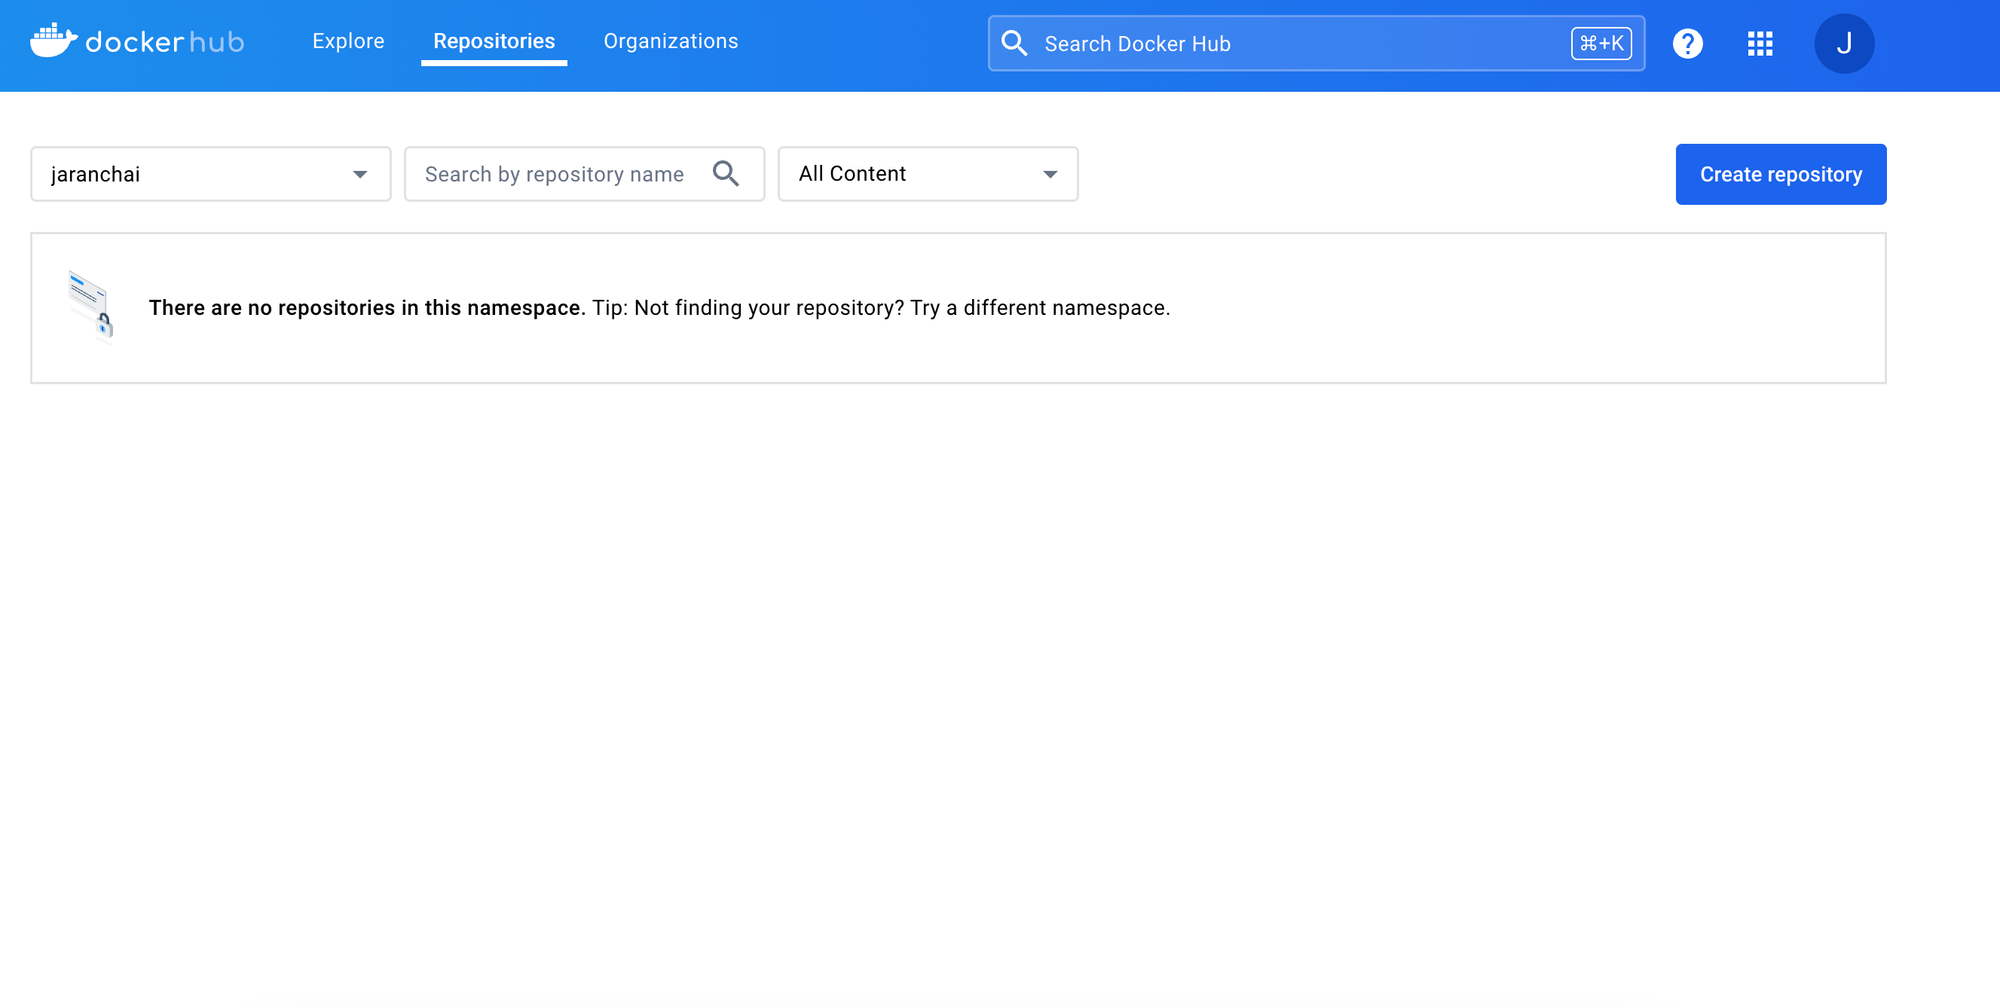
หลังจากที่สมัครเข้าไปแล้วจะได้หน้าตาประมาณนี้
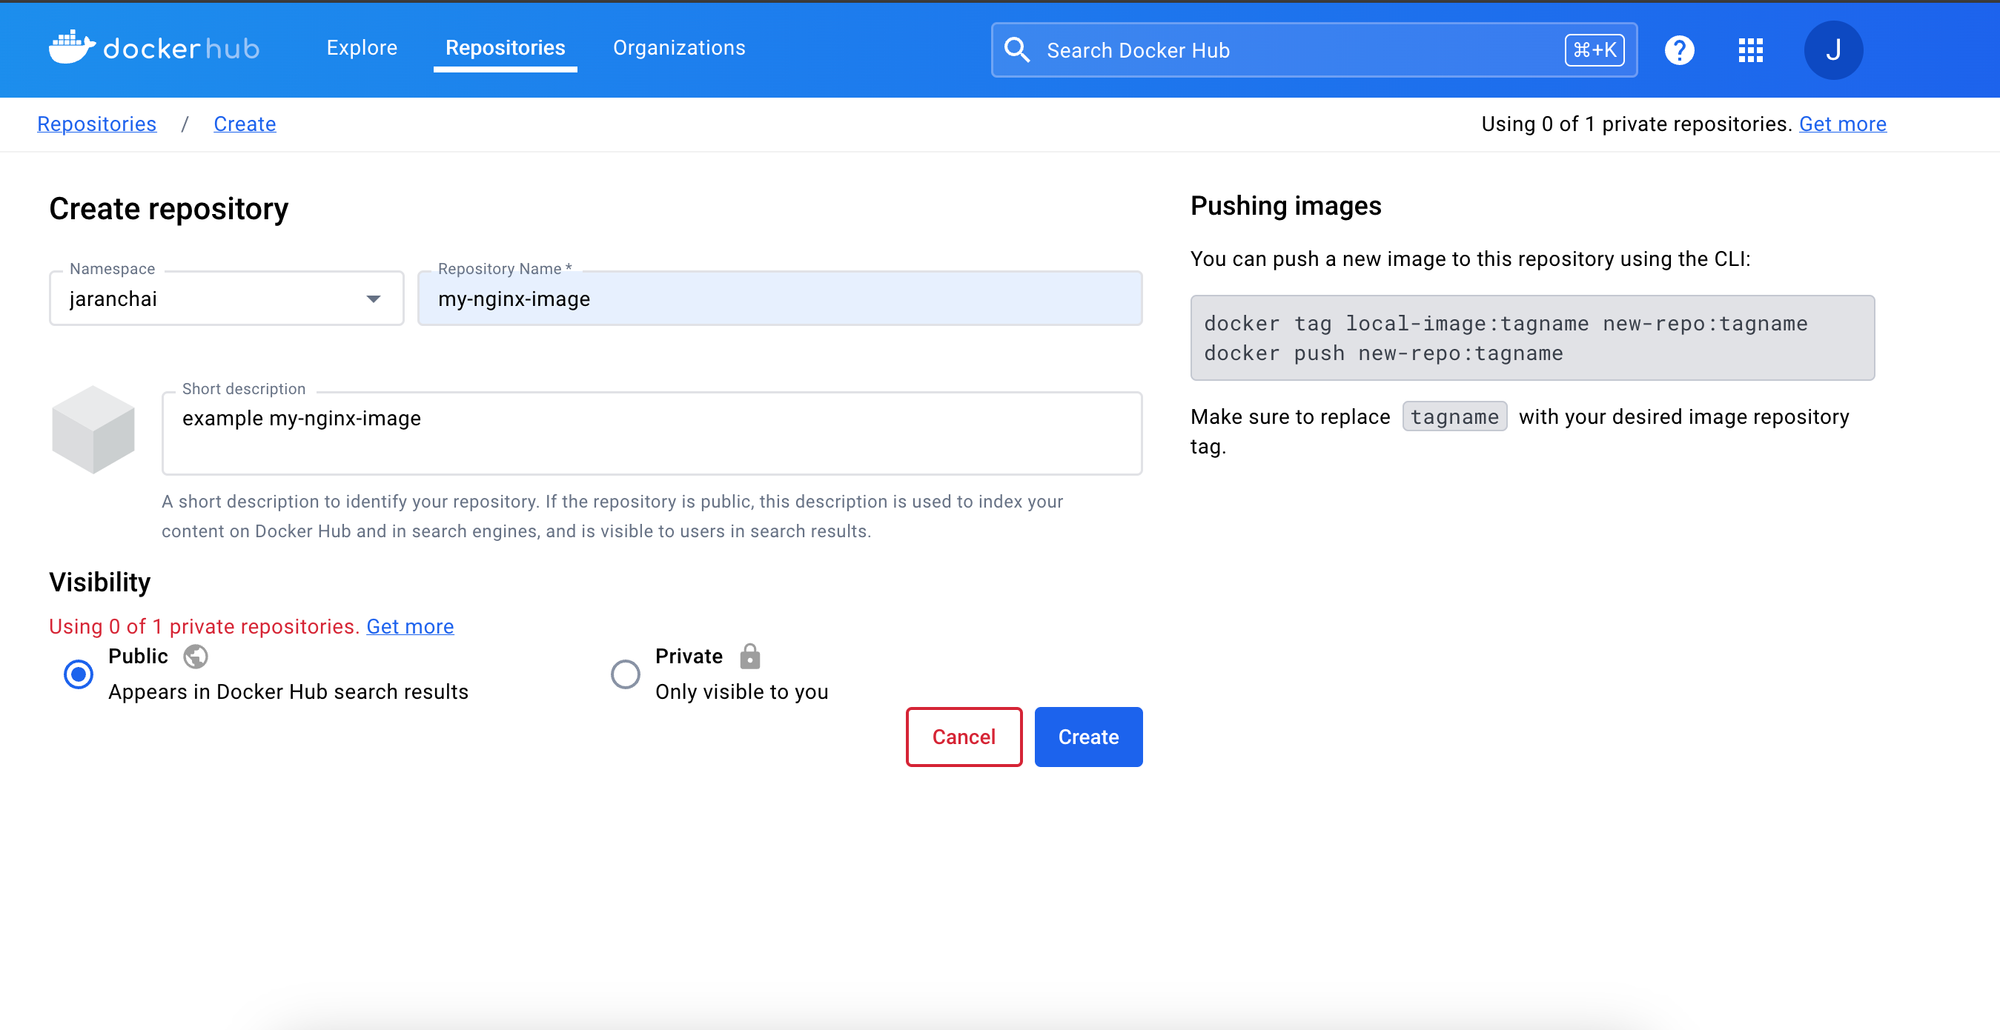
สร้าง Repository กดที่ Create Repository
จากนั้นมา เรามาลองดูข้อมูลของ Image ของเรากันก่อน โดยใช้ inspect
docker image inspect my-nginx-image:v1ลอง Push กันเลย
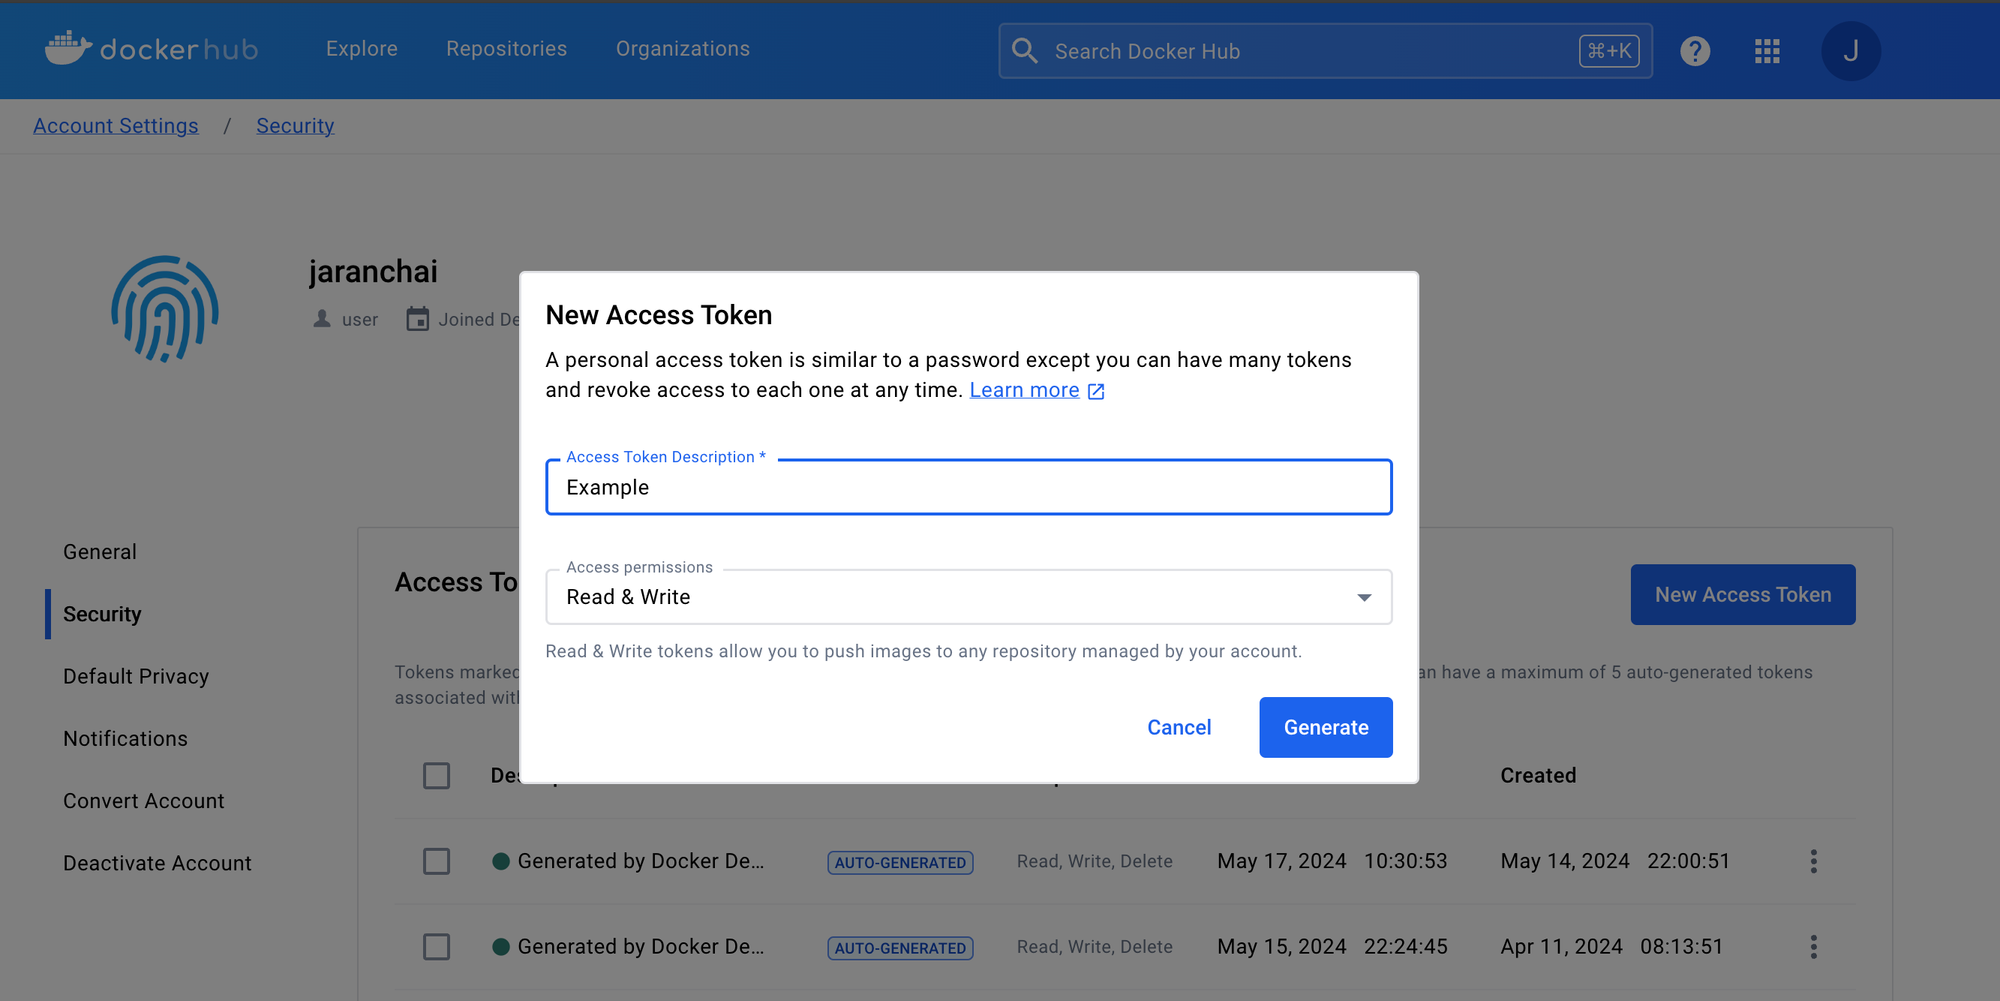
ขั้นตอนแรกก่อนที่เราจะ Login ผ่าน CLI เพื่อ push image เราจะต้องเข้าไปสร้าง Token ก่อน
จากนั้นกลับมาที่ CLI เพื่อ Login
- -u คือ username
docker login -u jaranchaiจากนั้นใน password ที่ได้จากการสร้าง Token
เริ่มจากเราลอง build image ใหม่ขึ้นมากก่อน เนื่องจากก่อนหน้านี้เราสร้าง my-nginx-image ซึ่งมันจะไม่ตรงกับ repository ที่เราสร้างไว้ใน Docker Hub
โดยเงื่อนไข คือ ชื่อ Image กับ Repository ของ Docker Hub จะต้องตรงกัน โดยจะมี format คือ username/repository name
docker container commit -a nutshell my-nginx jaranchai/my-nginx-image:v1เมื่อสร้าง image ตัวใหม่แล้ว ลองสั่ง Push image โดยระบุ ชื่อ image โดยชื่อของ image และ repository จะต้องตรงกัน
docker push jaranchai/my-nginx-image:v1
หรือ
docker push jaranchai/my-nginx-image:latest
ถ้าสามารถ push ขึ้นสำเร็จแล้วใน Docker hub จะแสดงผลดังนี้
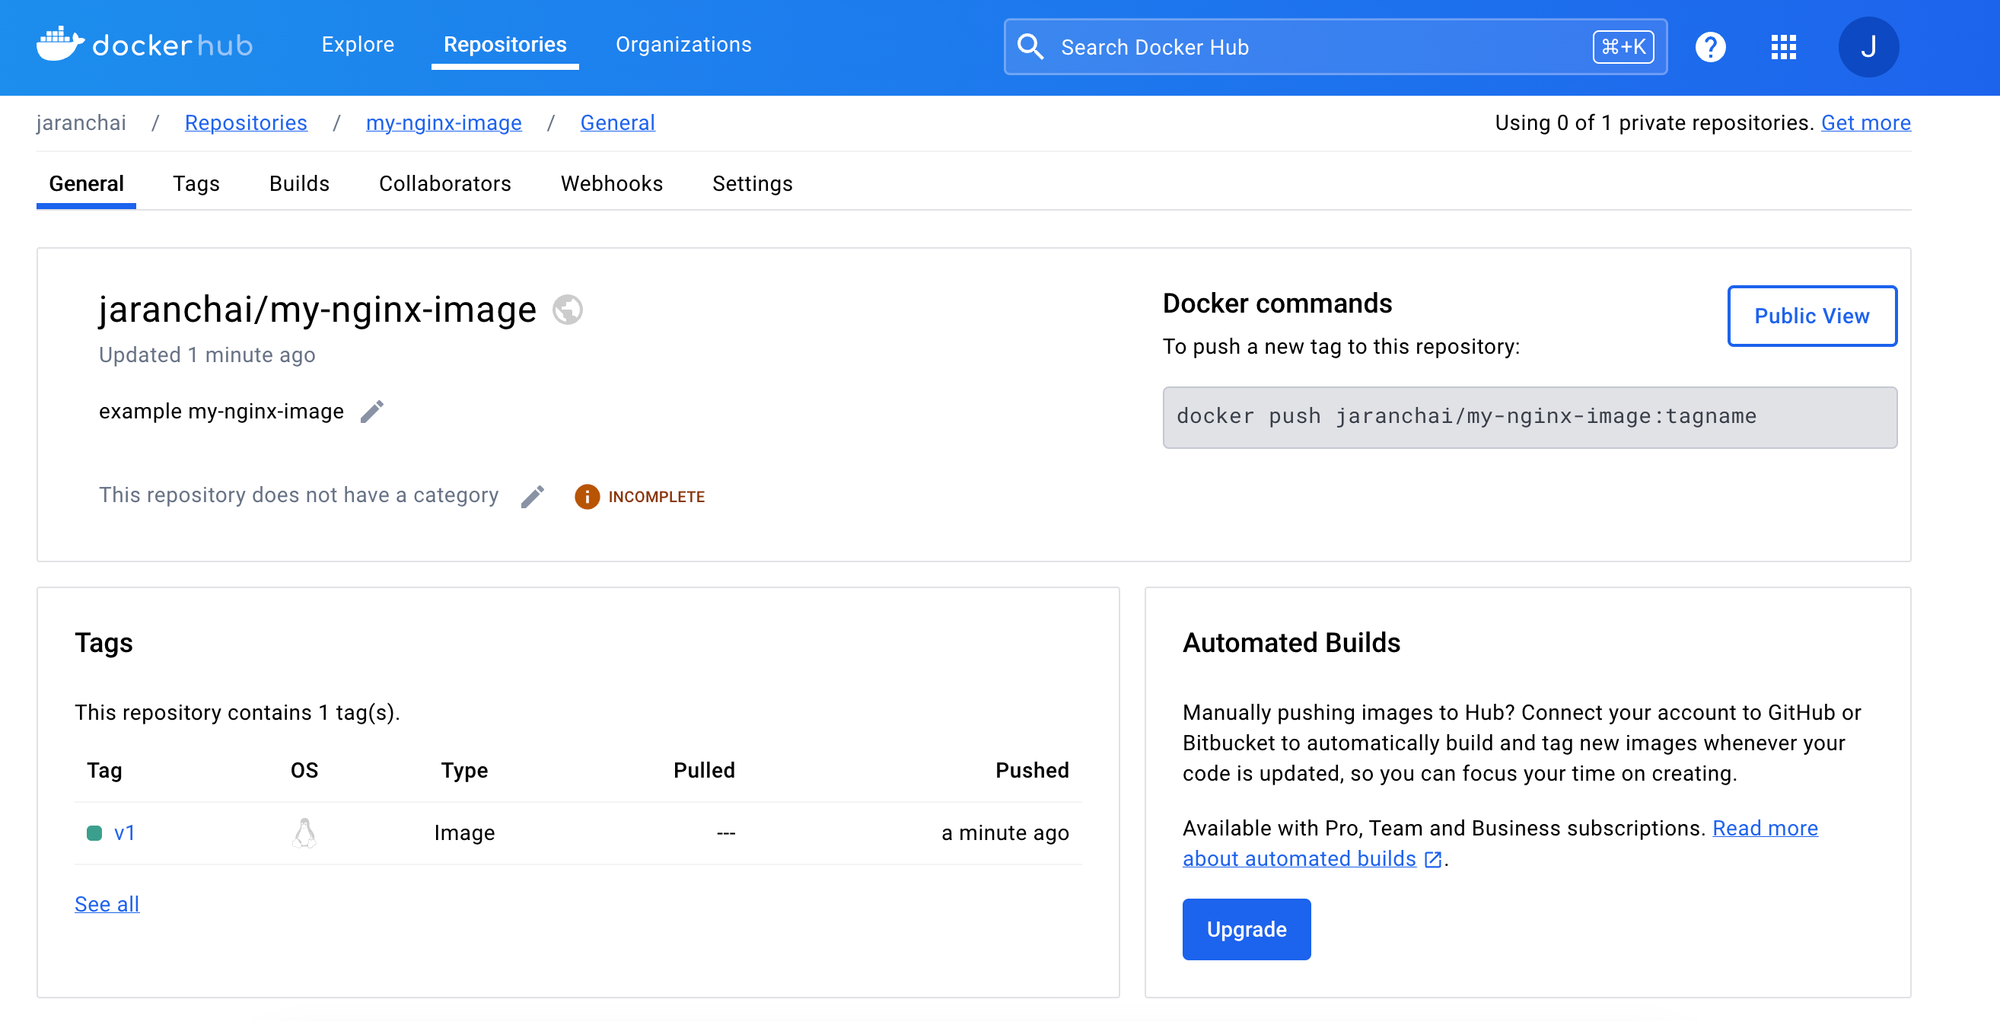
Docker Image Tag Pattern
Tag Pattern ที่เราจะพบบ่อยๆ
- Semantic version: 1.2.2
- Data versioning: 2024.03.25
- Environment: nginx:dev, nginx:uat, nginx:prod
- Hybrid version: 1.2.1-dev, 1.2.0-uat, 1.2.0-prod
- Hash versioning: nginx:cfe4ff9
สิ่งที่ต้องรู้เกี่ยวกับ tag คือ
- Tag are mutable
- Single Image can multiple tag
- Avoid to use tag latest in Production and Test Environment (ให้ไปใช้ SHA แทน)
Docker Container
เริ่มต้นที่ Command ที่ใช้ได้ของ container
docker container -h attach Attach local standard input, output, and error streams to a running container
commit Create a new image from a container's changes
cp Copy files/folders between a container and the local filesystem
create Create a new container
diff Inspect changes to files or directories on a container's filesystem
exec Execute a command in a running container
export Export a container's filesystem as a tar archive
inspect Display detailed information on one or more containers
kill Kill one or more running containers
logs Fetch the logs of a container
ls List containers
pause Pause all processes within one or more containers
port List port mappings or a specific mapping for the container
prune Remove all stopped containers
rename Rename a container
restart Restart one or more containers
rm Remove one or more containers
run Create and run a new container from an image
start Start one or more stopped containers
stats Display a live stream of container(s) resource usage statistics
stop Stop one or more running containers
top Display the running processes of a container
unpause Unpause all processes within one or more containers
update Update configuration of one or more containers
wait Block until one or more containers stop, then print their exit codesSet Environment via Dockerfile
เริ่มต้นที่ สร้างไฟล์ Dockerfile.env ขึ้นมาก่อน
จากนั้นใส่คำสั่งลงไปใน File นั้น
FROM alpine
ENV HELLO=world
Dockerfile.env
จากนั้นเพิ่มคำสั่ง
docker build -t alpine-env:v1 -f Dockerfile.env .-fคือ ไฟล์ที่จะใช้-tคือ Tag.คือ Path (Current directory)
เมื่อ build เสร็จแล้ว ก็ลอง run ดู
docker images -aลอง run ดูว่ามันได้เข้าไปอยู่จริงๆ ไหม เราอาจจะใช้ docker inspect IMAGE ID
docker inspect e0b07b21200cเข้าไปดูที่ Env
...
"Env": [
  "PATH=/usr/local/sbin:/usr/local/bin:/usr/sbin:/usr/bin:/sbin:/bin",
  "HELLO=world"
],
...
Working with Environment
หากเราต้องการที่จะแยกค่าตาม Environments โดยแยก .env ไฟล์
สร้าง .env ไฟล์ ขึ้นมา
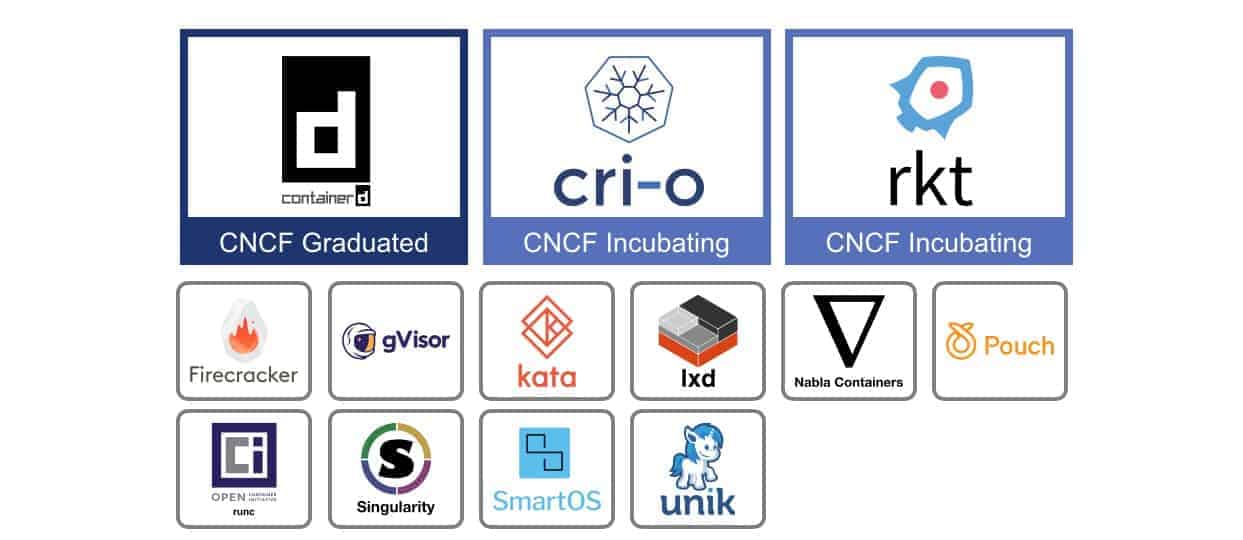
HELLO=world-env-fileAlternative Container Runtime
Docker Volumes
เมื่อเราทำงานและหยุดการทำงานของ container ข้อมูลที่เกิดขึ้นระหว่างที่ container ใช้งานอยู่นั้นจะหายไป
เริ่มต้นที่ลองเล่น โดยเริ่มต้นที่สั่ง run container ขึ้นมาก พร้อมกับสร้างไฟล์ simple.txt
docker container run --name demo alpine /bin/sh -c 'echo "This is a test" > simple.txt'เสร็จแล้วลองพิมพ์คำสั่ง เพื่อเช็คว่ามีไฟล์ simple.txt ใน container แล้วหรือยัง
docker container diff demoทีนี้ถ้าหากเราสั่งลบ container ข้อมูลก็จะหายไปด้วย
Volume ก็จะมาช่วยเราใน
Volume of persistent your data
สร้าง volume ใหม่ขึ้นมา ด้วยคำสั่ง docker volume create
docker volume create sampleถ้าเราอยากรู้ว่ามันถูกสร้างไว้ที่ไหน ให้ใช้ volume inspect
docker volume inspect simpleจะได้ผลลัพธ์ดังนี้
[
    {
        "CreatedAt": "2024-05-17T06:14:03Z",
        "Driver": "local",
        "Labels": null,
        "Mountpoint": "/var/lib/docker/volumes/simple/_data",
        "Name": "simple",
        "Options": null,
        "Scope": "local"
    }
]
แต่ถ้าเราลอง cd เข้าไปดู ก็จะไม่เจอ path ที่ระบุไว้
Mount volume to container
ถ้าอยากให้เข้าถึงข้อมูลใน path นี้ได้ เราก็จะ mount ด้วยการใช้ -v หรือ --volume แล้วระบุตำแหน่งที่อยากให้ mount ข้อมูลเข้าหากัน
docker container run --name test -it -v sample:/data alpineสมมติว่าเรา run docker ขึ้นมา
docker run -it --name demo -v sample:/data alpineแล้วลองสร้างไฟล์ hello.txt ใน /data ดู ตัวไฟล์ก็จะถูก mount ไว้ที่ sample เรียบร้อย
Create new container with different OS
ถ้าเราต้องการที่จะใช้ sample รวมกันกับ container อื่นๆ เราก็สามารถใช้ mount ข้ามกันระหว่าง os บนได้
docker container run --name test2 -it --rm -v sample:/app/data centos:7 /bash/shเมื่อ run แล้ว ลอง cd เข้าไปที่ cd /app/data
cd /app/data/จากนั้นลอง Lists ดูรายการใน directory
lsก็จะเห็นไฟล์ hello.txt ที่เราสร้างก่อนหน้านี้อยู่
ถ้าเราอยากรู้ว่าไฟล์ simple อยู่ที่ไหน ลอง run
docker container run -it --privileged --pid=host debian nsenter -t 1 -m -u -n -i shจากนั้นลอง list รายการดู
ls -l /var/lib/docker/volumes
ls -l /var/lib/docker/volumes/sample/_data/
สิ่งที่ต้องระวัง
การ mount volume นี้ เป็นการแชร์ข้อมูลของหลายๆ containers จะมีโอกาศที่หลายๆ containers จะใช้ไฟล์ร่วมกัน ซึ่งจะทำให้เกิดความช้าหรือเกิดปัญหาได้ ดังนั้นพยายามอย่าใช้ไฟล์เดียวกัน
Dynamic Content
สร้างไฟล์ index.html แล้วเพิ่ม
<h1>Hello, docker</h1>index.html
จากนั้นสร้างไฟล์ Dockerfile-volume แล้วเพิ่มคำสั่งลงไป
FROM nginx:latest
COPY index.html /usr/share/nginx/html/index.html
Dockerfile-volume
จากนั้นให้ build ตัว Dockerfile-volume ที่เขียนมา
docker build -f Dockerfile-volume -t nginx-volume:v1 .และ run image
docker run -d --rm -p 8080:80 nginx-volume:v1จากนั้นลอง curl เข้าไปที่ http://localhost:8080 ก็จะเห็นข้อมูลที่เราใส่ไปใน index.html
curl http://localhost:8080Mount volume to container
จาก build ตัว Dockerfile-volume ที่ก่อนหน้านี้ เราสามารถสั่ง run และทำการ mount volume ผ่านคำสั่งได้เลย
(อย่าลบลบ container ก่อนหน้านี้ที่ run อยู่ ไม่งั้น port จะชนกัน)
docker run -d -p 8080:80 -v $(pwd)/index.html:/usr/share/nginx/html/index.html nginx-volume:v1ลองแก้ไขไฟล์ index.html
echo -e "<h3>I was made for lovin' you baby</h3>" >> index.htmlแล้วลอง curl เข้า curl http://localhost:8080 ก็จะเห็นตัวใหม่เพิ่มเข้ามา
Docker Network
- ไม่ได้เข้าต่อ ติดประชุม 😄